Control the robot using Text files
Robot systems are often controlled by other software. Every software can create text files as output. In this lecture you will learn how to control a robot using commands written into a text file. You will set up a directory, where you can place a text file. Your robot will check this directory periodically and if a file appears, it will pick it up, read it and follow the instructions in it.
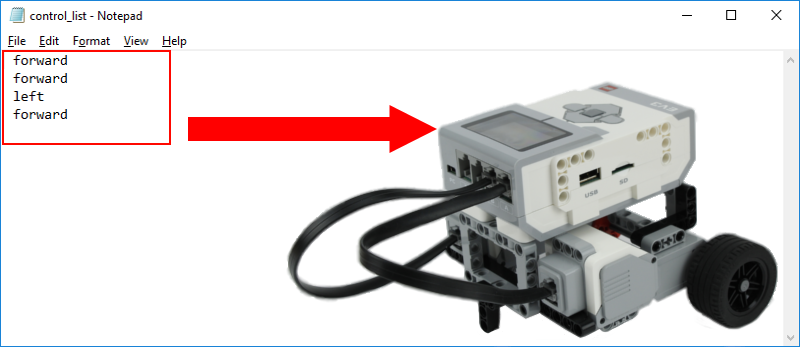
Figure 1 - Move your robot from a few commands added to a text file
Requirements
- Ozeki 10 installed: Installed Ozeki 10 Robot OS
- Lego connection installed: Connect the Lego robot to Ozeki 10
- SNAP basics: Basic knowlege of the Snap programming language
Create 'TXT File' connection in Control Panel and route it to SNAP!
Control your robot with a text file you have wrote. You will need Ozeki 10, so you can connect the text file to your robot. The connection you will have to create is called 'TXT File'. After you have opened Control panel, just click on 'Create new Connection', select the 'Application' connection method and choose 'TXT File' (Figure 2). These files will just contain a few commands.

Figure 2 - Select 'TXT File' from the application connection list
To finish creation, please modify a few options of the connection (Figure 3). Here you can type a specific name for the connection, switch between the file formats. Choose the List format for this lecture, because you can use more than one message in a single text file. In the same way you see it on Figure 1. Please specify the outbox directory too. It will store the commands.
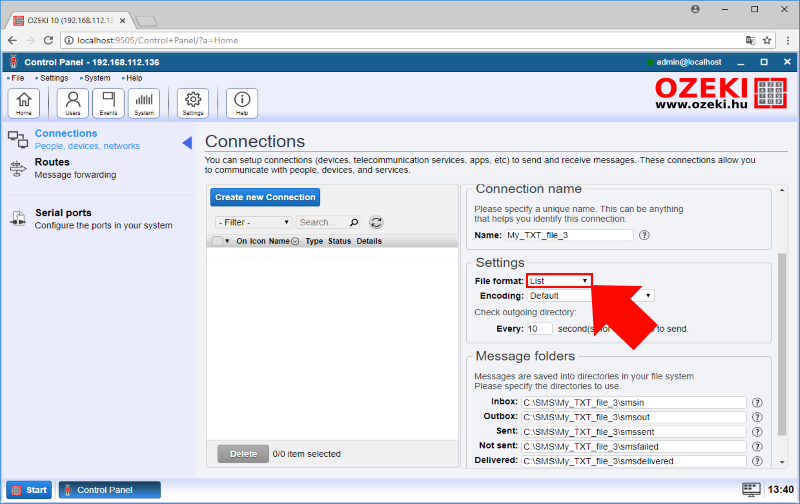
Figure 3 - Select the 'List' file format from the connection list
The next thing you have to do is to forward all 'TXT File' messages to the SNAP application. You can create routes between Ozeki 10 connections. Do it by selecting 'Routes' from the Control Panel and after that click on 'Create new Route'. Here you can select the two endpoints. The message will come 'From' the 'TXT File' connection and arrive 'To' Ozeki Snap (Figure 4).
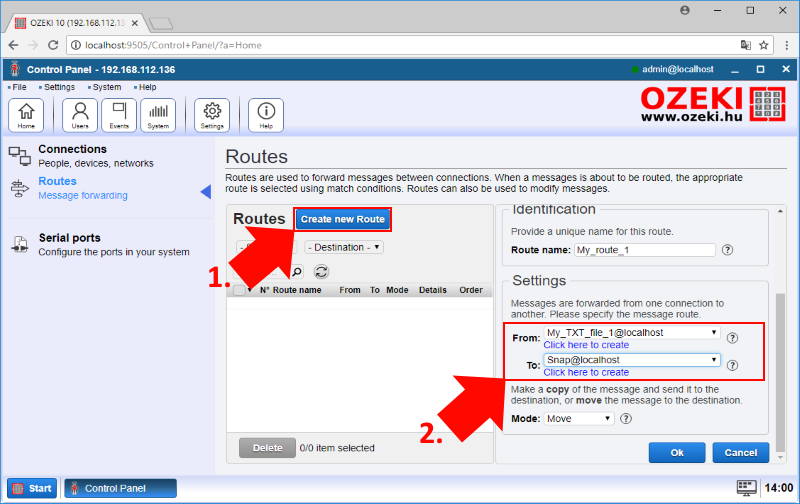
Figure 4 - Create route from 'TXT File' connection to SNAP
Write code to receive all command messages
Control your robot with text messages. You need to write a little application in SNAP. First you need to drag the entry point 'When green flag clicked'. Then add the 'Repeat until' block, which ensure that the program will finish if it reads the end character. In the code below the end character is the space. You can do this by adding the 'Matches' block, select the message variable, that you have to create, and type the ending command to the other side (Figure 5). In the 'Repeat until' block first you have to add the 'Get next message', that waits for the incoming messages, and the 'Set to message value (string)' block, that stores the message into the selected variable.

Figure 5 - Get the message and store it into the variable
Create a few commands to control your robot
After you stored the message to a variable, you can match it with directions and do the instructions in case of match. This can be accomplished with four 'if' blocks that compares the message with four different movement direction (Figure 6). Do it with '[variable] matches [text]' blocks. Select the 'message' variable and type the command text you want the variable to be compared to. If there is a match for one of the if -s, the inside block will be executed. The 'drive [motors] [to_direction] [for_sec]' is the block that can be found under each 'if' statement. 'drive' can move the connected motors to a preferred direction for a selected amount of seconds.
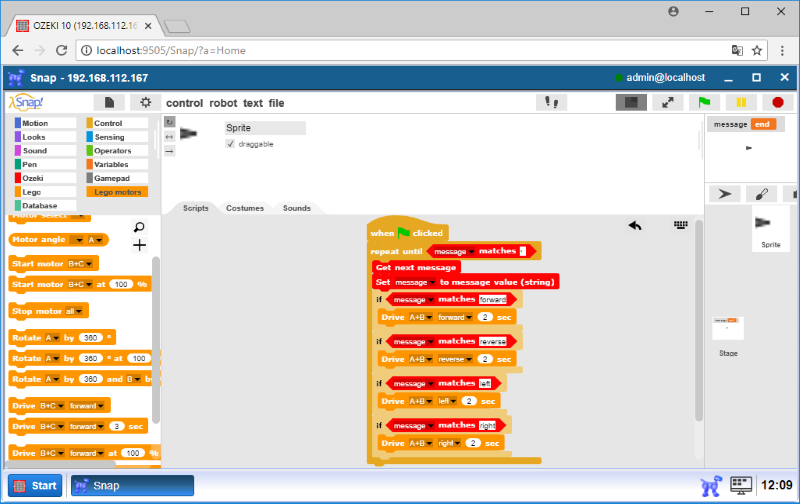
Figure 6 - The message stored in a variable is compared with 4 commands
Create text file and save it to the output folder selected in Task #1
Before you start the SNAP program, you need to create the text file that contains the commands for controlling the robot. So, just create a new empty text file and open it. Here you can write the control commands, one line contains only one command, and watch out for that you have to type a space character at the beginning of every line (Figure 7). The last line of this text needs to be two space characters, which will be the end message for the SNAP application.

Figure 7 - Create a text file to control your robot
In the last step the only thing that you need to do is to move the text file, run the SNAP program and see the results. When you start the program, it will stop all time until reaching the 'Get next message' block, which will wait for the next message. At this point you have to place the text file to the outbox folder (Figure 8) that you specified and created at setting up the connection. When you dragged the text file you have to wait a few seconds until the next outgoing messages, and if you done everything correctly your robot is going to execute all the instruction one after the other.
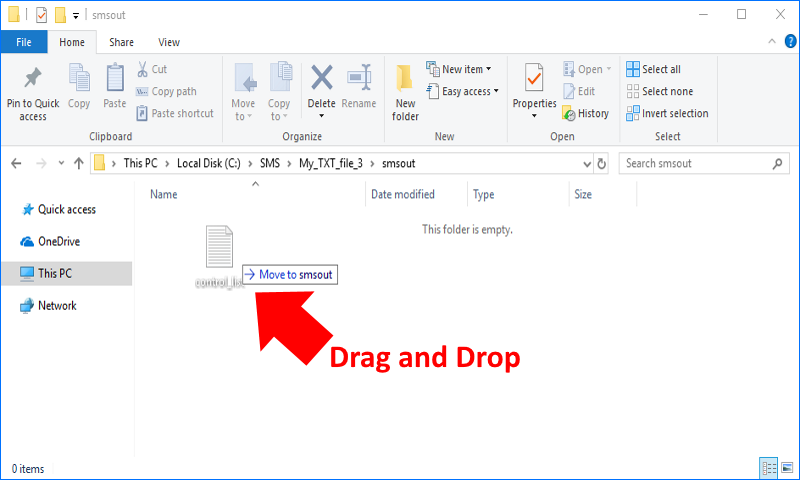
Figure 8 - Place text file into the outbox directory
Program code
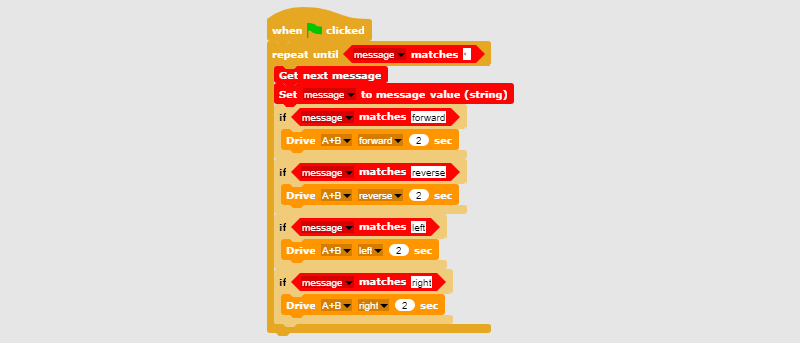
Figure 9 - The program can read text files and execute the commands from them
|
|
With this program code, control your robot using a text file The code can give instruction to the robot by simple text commands It is easier to follow the guide if you have the codes in front of you: Download Ozeki Snap code for controlling the robot with text files |
