Collision detection / sensor feedback based navigation
Robots that navigate in a room need to be prepared to detect collisions. A touch sensor can be used to detect if the robot hits the wall or an obstacle. In this lecture you will learn, how to use the touch sensor to do the detection and how to handle this action to navigate around an obstacle.
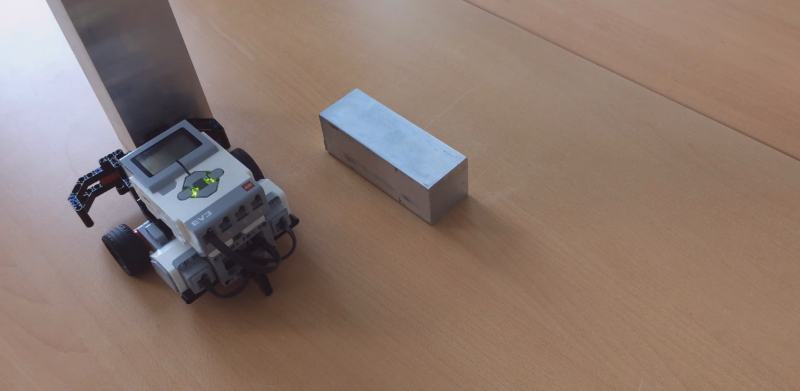
Figure 1 - Ozeki Sniffer with bumper
Requirements
- Ozeki Sniffer: Sniffer build instructions
- Ozeki Bumper: Bumper build instructions
- Ozeki 10 installed: Installed Ozeki 10 Robot OS
- Lego connection installed: Installed Lego Bluetooth connection
- SNAP basics: Basic knowlege of the Snap programming language
Create a program to move your robot forward.
First you should add the 'when green flag clicked' entry point from the Control category, so the program can be started anytime using the green flag on the top right corner. Without this block, you can run the script by clicking on the block. Then you have to attach the 'Drive [motors] [direction] at [power]%' block from Lego motors. After that, select option A+B for the 'motors' field in order to drive the Sniffer's motors. Finally select the 'forward' option for the direction field and type number 20 to drive them at 20% power.
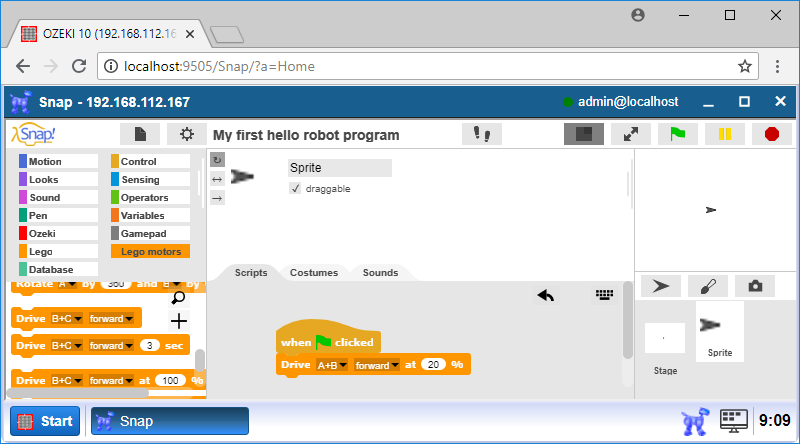
Figure 2 - The code for starting the Sniffer
Upgrade the code to stop it if the Touch Sensor is pressed.
After the previous step, you have to add the 'wait until' block because you need to get information when the robot presses the Touch Sensor. Please attach a '=' operator from the Operators menu, where the left side is 'Button on' block from the Control menu with the Touch Sensor selected and on the right side it is the 'on' text (Figure 3). Put this block into a 'wait until' block's condition part. The block checks if the first value is equal to the second value and keeps the program paused until the condition is true. Both side are equal if the Touch Sensor is pressed, so the code continues.
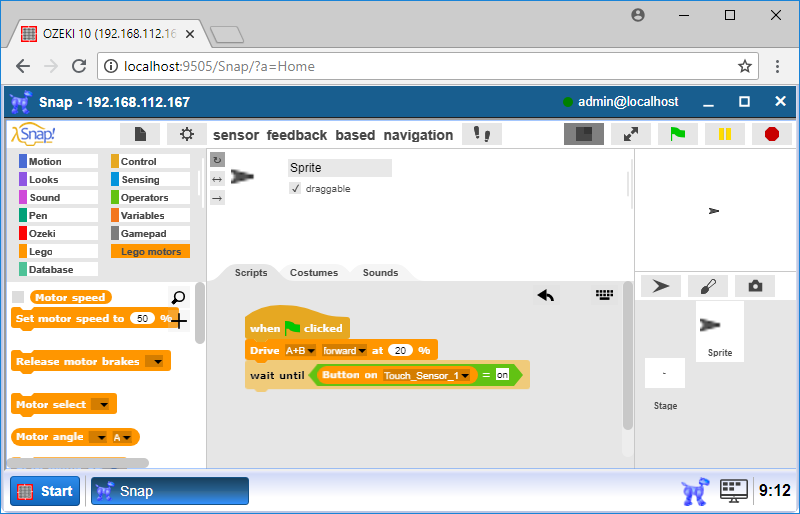
Figure 3 - Checking the state of the Lego Mindstorms EV3 Touch Sensor
Modify code to move backward if collided!
If the 'wait condition' meets, the robot collides with an obstacle, so it can go backward with a 'Rotate [motors] by X° at Y%' block you can attach from the Lego motors menu, where motors are A+B motors and set the X to -180°, because if you use this value, the robot will go backward by turning the wheel 180°. You can configure the Lego robot motor speed with the Y variable. Set the maximum speed to the robot to 35% as you can see it Figure 4 below.
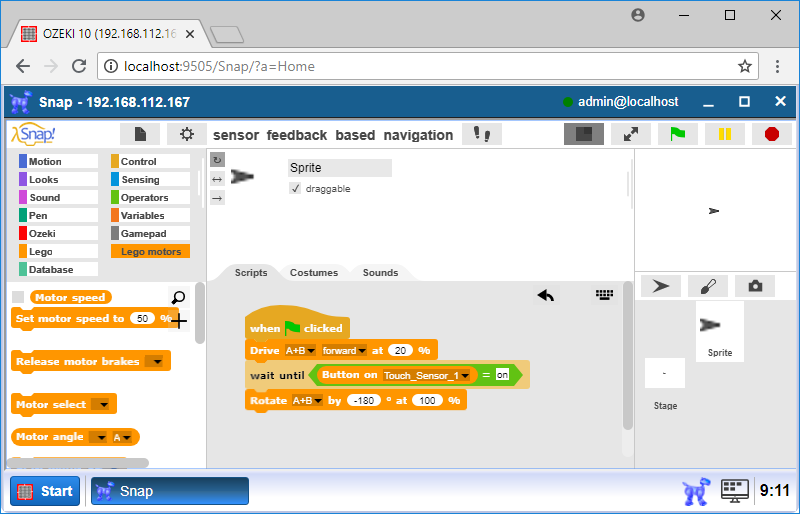
Figure 4 - Drive the robot backwards by rotating the motor
Turn right after it moved backward!
This is the last step to test the robot, but before it, you have to attach the 'Drive [motors] [direction] X sec at Y%' block from the Lego motors menu, where motors are A+B motors and you need to set the X value to 0.5 sec, because the robot turns right only for one second. You have to set the motor speed with Y value, which parameter should be 35% (Figure 5). The robot will move at medium speed. After the right turn, the robot moves forward until it collides with an object again. It will repeat it's task forever or at least until the battery has power or the code is stopped.
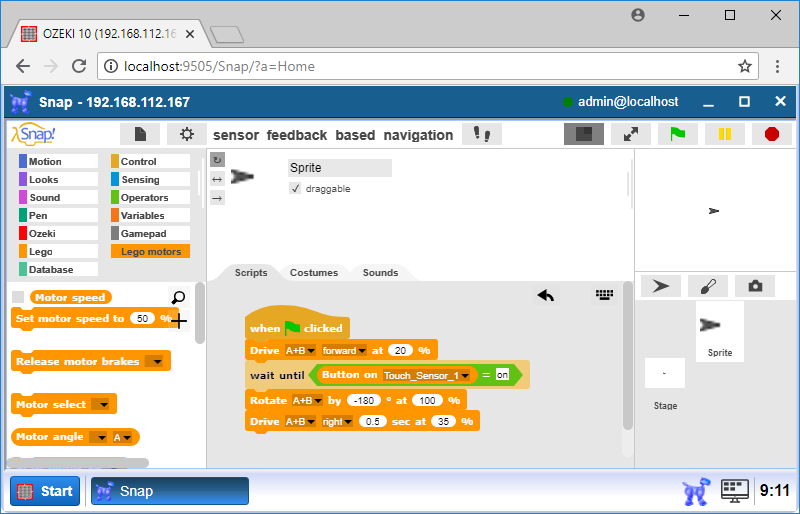
Figure 5 - Turn the robot right and move forward
Put them to forever loop and test the program
Then your are going to add the 'Forever' block from the Control menu as you can see on Figure 6 below. This is an infinite loop, becuse that loop never ends unless the 'stop all' block is activated, but you won't use that block in this lecture. Now, the robot will go forward continuously until the robot collides with an obstacle. After that the robot should turn right and go forward again.
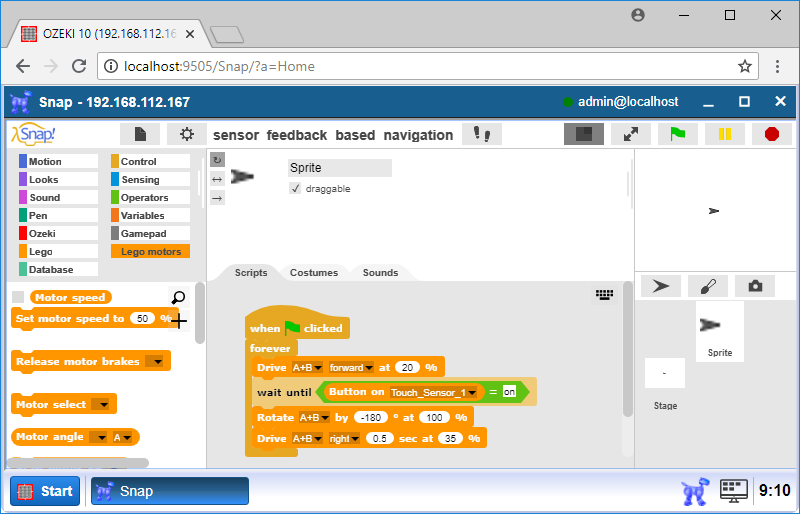
Figure 6 - Complete program
Program code

Figure 7 - The program code can run forever, so the robot can repeat it's task
|
|
Download the program code to see how the button works It is easier to follow the guide if you have the codes in front of you: Download Ozeki Snap code for sensor feedback based navigation |
