How to use an RF 2.4 GHz Transceiver
In this guide, you will be able to learn about the RF 2.4 GHz Transceiver. This module is really powerful since it can send or receive text messages in a range of 100 meters and also able to communicate with multiple other modules. The document contains the basic definitions that you need to know about this module, and a step by step guide which demonstrates how you can integrate this module into your solution using Ozeki 10. Let's start right now.
What is an RF 2.4 GHz Transceiver?
The RF 2.4 GHz Transceiver, like the NF24L01 module, uses the 2.4 GHz band and it can operate with baud rates from 250 kbps up to 2 Mbps. If used in open space and with lower baud rate its range can reach up to 100 meters.
How does an RF 2.4 GHz Transceiver work?
The module can use 125 different channels which gives a possibility to have a network of 125 independently working modems in one place. Each channel can have up to 6 addresses or each unit can communicate with up to 6 other units at the same time. The power consumption of this module is just around 12mA during transmission, which is even lower than a single LED. The operating voltage of the module is from 1.9 to 3.6V, but the good thing is that the other pins tolerate 5V logic, so we can easily connect it to an Arduino without using any logic level converters.
Three of these pins are for the SPI communication and they need to be connected to the SPI pins of the Arduino, but note that each Arduino board have different SPI pins. The pins CSN and CE can be connected to any digital pin of the Arduino board and they are used for setting the module in standby or active mode, as well as for switching between transmit or command mode. The last pin is an interrupt pin that doesn’t have to be used.
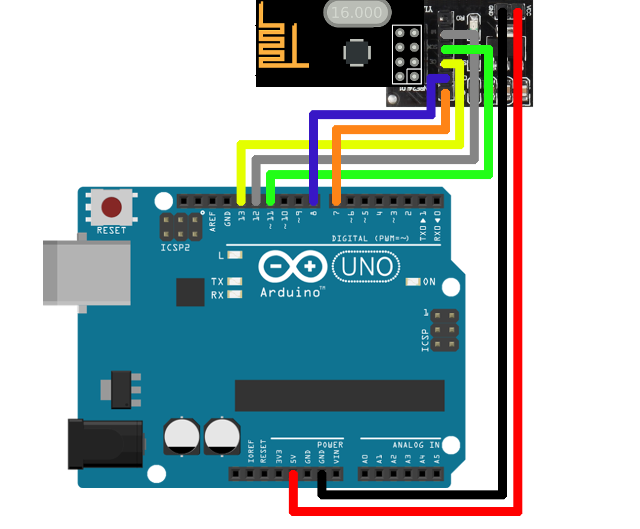
Arduino RF 2.4 GHz wiring diagram

How to use an RF 2.4 GHz Transceiver in Ozeki
RF 2.4 GHz Transceiver connections can transmit or receive text messages. You can create these connections by acquiring an NRF24L01 module and an Arduino. Try it out in Ozeki 10 and route messages from/to the RF 2.4 GHz connection. See how to wire the system in step 1. To make wireless conversations, you can add multiple transceivers. To use the RF 2.4 GHz Transceiver in Ozeki, you first need to download Ozeki Robot Developer. Ozeki Robot Developer will install the Arduino libraries needed to use this sensor efficiently.
Download Ozeki Robot Developer

After Ozeki Robot developer is installed, you need to upload the RF 2.4 GHz Transceiver control code to your Arduino. You can find the code and download instructions on the following pages. The upload process includes two steps: first you need to format the EEPROM of the arduino, then you need to upload the control code. The procedure is very simple, it only takes a few seconds.
Upload the RF 2.4 GHz Transceiver code to Arduino Uno
Upload the RF 2.4 GHz Transceiver code to Arduino Mega 2560
Upload the RF 2.4 GHz Transceiver code to Arduino Nano
The arduino sensors and Ozeki will communicate over the USB port using the Ozeki RF 2.4 GHz Transceiver protocol. This protocol makes it possible for you to use the sensor directly on your PC. You will be able to control this sensor through the web based user interface or you will be able to communicate with it using Ozeki Chat. You can read more about chat control on the following page.
How to communicate with the RF 2.4 GHz Transceiver using chat
It is important to understand chat control, because when you build a robot, the way you wish to control this sensor is by sending and receiving messages. If you open the Ozeki Robot Developer app, you will see, who you can write a C#.Net program to work with this sensor.
Connection steps
- Wire the RF 2.4 GHz Transceiver to your Arduino
- Attach the Arduino board to your computer
- Check the COM ports in Windows device list
- Open the Arduino application on your computer
- Upload example code to your microcontroller
- Type https://localhost:9515 in your browser to open Ozeki 10
- Choose the connection of RF 2.4 GHz Tranceiver
- Test the transceiver by sending data
System overview
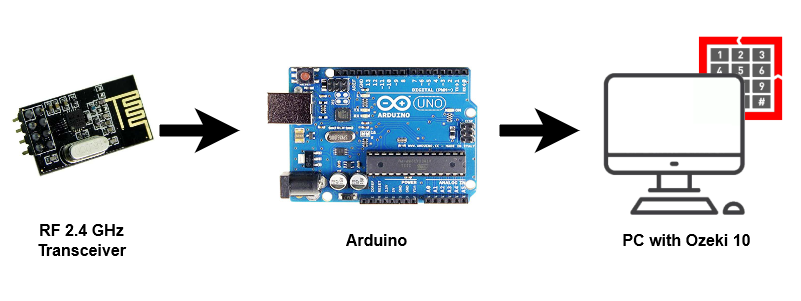
The system we suggest consists of a RF 2.4 GHz transceiver, that is wired to the analog port of your Arduino. The Arduino will be responsible for reading data from this device in real-time. The brain of the system will be running on a PC (Figure 2). On the PC, Ozeki 10 will be able to manage the communication. You can easily run Ozeki 10 using a webbrowser

Prerequisites
- NRF24L01
- Ozeki 10 installed on your computer
- Programmable board (Arduino Mega/Nano/Uno)
- USB cable is needed between Arduino Mega/Nano/Uno and your computer
Step 1 - Wire the 2.4 GHz Tranceiver to your Arduino
You can see how to wire the NRF24L01 transceiver to any of the following boards:
After wiring, please plug the board to your computer!
Step 2 - Upload code to the micrtocontroller
The next step is to upload a code to the microcontroller that will operate on the 2.4 GHz transceiver. To do that, you need to open the Arduino application on your computer. Here, first you have to check the port, that the transceiver is properly connected to your computer. Then, you just need to go the link above, copy the code and paste it in the Arduino application. Lastly, just click on Upload in Arduino and the code will be uploaded to the microcontroller.
Step 3 - Start Ozeki 10 to try the 2.4 GHz Tranceiver
With your Arduino is connected to your Raspberry Pi, now you can try out the 2.4 GHz transceiver. For that, you need to open the GUI (Graphical User Interface) of Ozeki 10. That can be done by typing localhost:9513 to your webbrowser and hit Enter. Here, Ozeki 10 automatically detects the connected devices, so once you connected the transceiver, you will be able to see it in the list of connections. All you have to do here, is to open the connection, and send your first test message using the transceiver.
Step 4 - Configure your 2.4 GHz Tranceiver in Ozeki 10
In order to configure your 2.4 GHz Tranceiver (attached to your Arduino) in Ozeki 10, that is installed on your computer, you need to open the graphical user interface (GUI) of Ozeki 10. You can open the GUI by entering the URL of the computer into your webbrowser. For example, if our PC has an IP address of 192.168.1.5, we would enter http://192.168.1.5:9513 into our webbrowser.
Step 5 - Understand the 2.4 GHz Tranceiver protocol
The RF 2.4 GHz Transceiver can communicate with Ozeki through the following protocol.
References:
https://howtomechatronics.com
