How to print with the 3D - Debrecen printer?
The 3D - Debrecen Printer is capable of creating any object that fits into the movement range of its extruder head. This tutorial displays how to print a 3 dimensional bunny (often labelled as Stanford Bunny) by using our 3D - Debrecen printer. You can learn how to create 3D print-ready files from this article.
Getting ready for printing
To start your 3D printing, you will need to set up your 3D - Debrecen printer and connect it to your device. The 3D - Debrecen printer uses a software of it's own, so you will need to have the
3D - Debrecen Printer Software downloaded from here:
http://3d-debrecen.com/p_17-download.html
You also have to have your 3D - Debrecen printer loaded with PLA filament. Please note that additional filament can be ordered from this site. If you are not familar with loading the 3D - Debrecen printer, please, click here for our detailed walkthrough.
Getting your Bunny's blueprints
Usually designers use design files which can be easily recognized from their .stl format. If you don't want to design your own
object by using a CAD-software, you can download premade designs from different websites. Our bunny's design can be found here:
Download Bunny.stl
Getting your G-code for printing
To get your G-code, you will need to use MakerBot Desktop. We are using MakerBot Desktop 3.9.0. in our tutorial. To download this software, please visit this site: http://www.makerbot.com/desktop
Once you have installed MakerBot Desktop, it is ready for creating G-code for multiple printer types. The 3D - Debrecen Printer uses the standard .gcode format which is also used by MakerBot Replicator Dual.
As the first step, you will have to change the default device type to Replicator(Dual). To do this open the Devices menu on the top menubar, go to the Select type of device item and choose Replicator(Dual) from the list (Figure 1).

Figure 1 - Setting Makerbot Desktop to Replicator(Dual)
As a result, the MakerBot's Prepare tab (shown on the image above) is refitted to the size of the printer. 3D - Debrecen Printers use roughly the same size of extruder bed so this option is perfect to see the preview of your bunny.
The second step is about configuring the printer settings. For printing we won't use any support or raft under the bunny. The heatbed temperature should be 60 and the extruder head should be 250 degrees celsius. The printed material should be PLA. We can set these by clicking on the settings menu (Figure 2) and configuring the following options (Figure 3). Please be aware that the right extruder head of the Replicator (Dual) qualifies as the extruder head of the 3D - Debrecen printer.
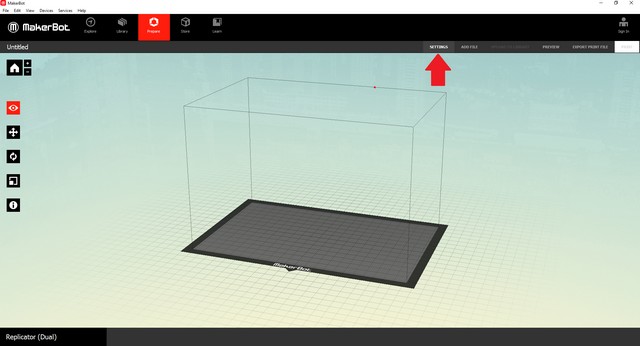
Figure 2 - Opening the Settings panel
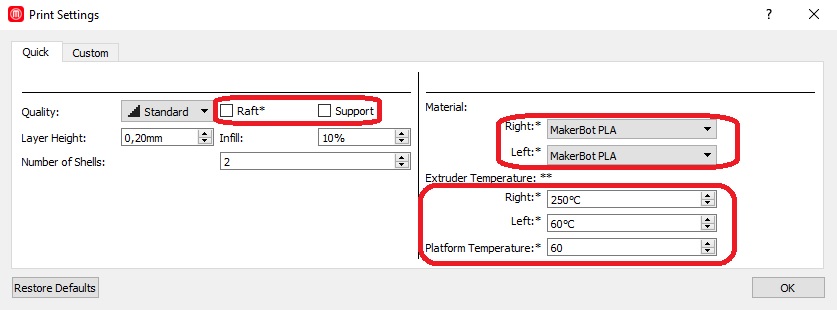
Figure 3 - Configuring printer settings
As the third step we will have to open our design file in MakerBot Desktop.
To do so, you can either drag and drop your design file to MakerBot's Prepare tab or use the software's browsing capabilities to browse the downloaded bunny blueprint. You will find it in your Downloads folder by default (Figure 4 and 5).

Figure 4 - Opening the file chooser of Makerbot Desktop
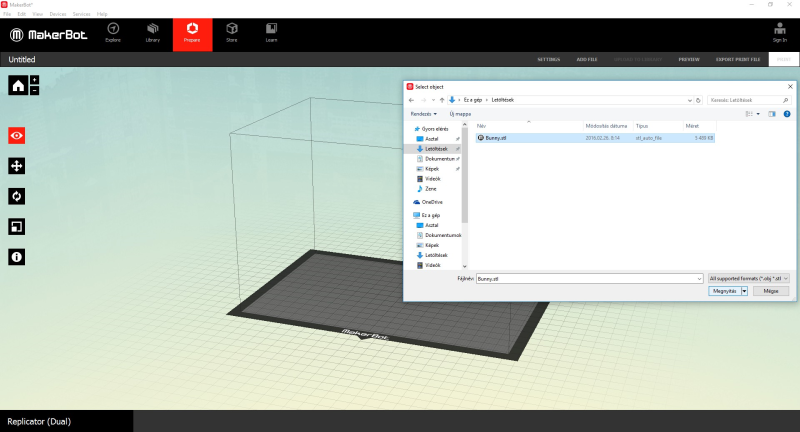
Figure 5 - Browsing the design file
Once you have opened the design, you will see it in the Prepare tab (Figure 6). On the left side of the window, there are five buttons. The view (selected by default and marked by an eye icon), the move (marked by four straight arrows), the rotate (marked by two curved arrows), the scale (marked by two rectangles) and the information.
To achieve the fastest and best results with the 3D - Debrecen Printer you will have to position your bunny to the middle of the extruder bed. To do this, you will need to use the move command by selecting it's icon OR pressing the M key on your keyboard.
If your bunny is not selected by default, click on it to select it. After having your bunny selected and the move function activated, you will be able to drag your model on the extruder bed. Position it to the middle as you can see it on these pictures (Figure 6 and 7).
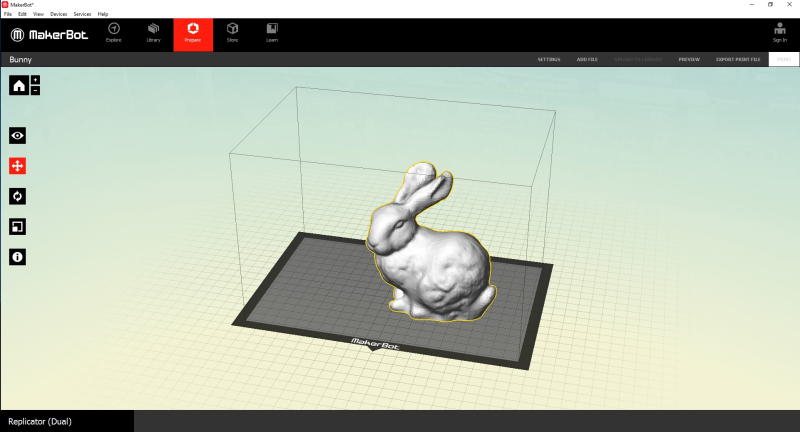
Figure 6 - The 3D model of the bunny before movement
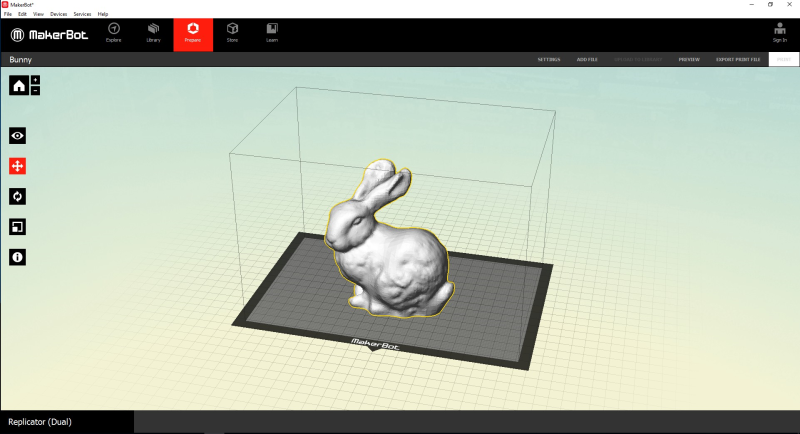
Figure 7 - The 3D model of the bunny after movement
When your bunny is positioned, it is ready for printing. 3D - Debrecen printer works with a so called G-code, which is basically a series of printing and movement instructions. To generate the G-code, you will need to click on the Export print file button on the top sidebar (Figure 8). Now you should see a classical Save as... window opened.
Since the 3D - Debrecen printer uses the .gcode format, you will have to select the GCode, slice only(*.gcode) from the file formats (Figure 9). You should also browse a location for your result. Once you are done, press the Save button.
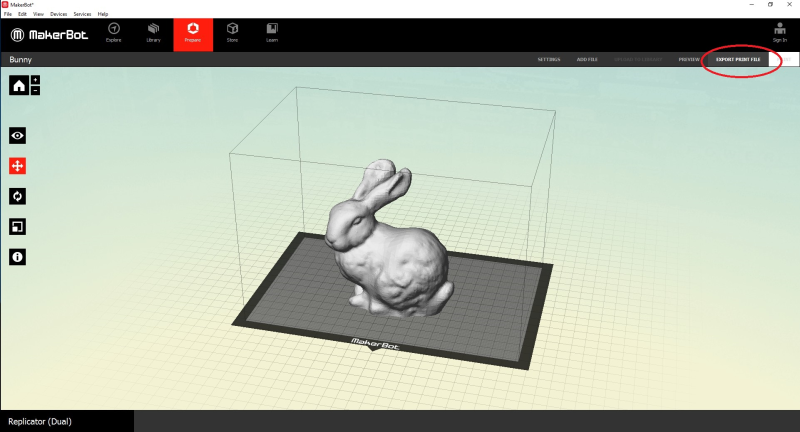
Figure 8 - The Export print file button can be found on the top right corner
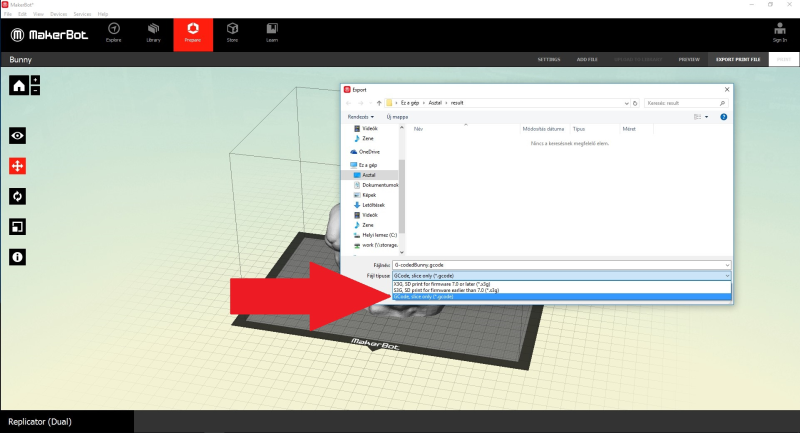
Figure 9 - Selecting the .gcode file format
A process bar will appear which will display the desired quality of your bunny (Figure 10). Once it is at 100%, the G-code of your bunny is ready (Figure 11). If you open this G-code with the 3D - Debrecen Printer Software, the printer immediately starts to create your Bunny.

Figure 10 - The Makerbot Desktop processes the design file
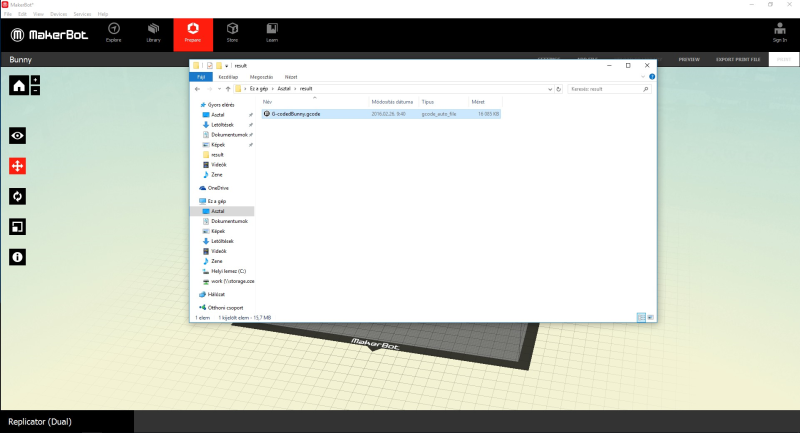
Figure 11 - The result can be found in the targeted folder
If you have any questions about creating the G-code, please, contact us here. If you have liked this tutorial, check out our other interesting and related articles below.
