Modbus to database
This in-depth guide takes you step-by-step through building a robust data storage system, from downloading and installing MySQL to creating custom tables for your incoming and outgoing Ozeki messages. But it does not stop there! We will also guide you through configuring Modbus Gateway to seamlessly connect your sensors and devices directly to your MySQL database. Invest 15 minutes and unlock a powerful solution for organized, efficient data management within your Ozeki environment.
What is Modbus?
Modbus, a workhorse in industrial automation since 1979, is a communication protocol that acts like a common language for electronic devices. Imagine a master computer (like a supervisor) asking slave devices (sensors or controllers) for data (readings or status) or even sending control commands. It comes in various flavors for wired serial connections (RTU & ASCII) or network communication (TCP), making it a simple, open-standard, and reliable workhorse for industrial data exchange.
What is Modbus to database?
Modbus to database means recording the sensor data to a database using the Modbus protocol through the Modbus Gateway.
How does Modbus Gateway work?
Here is the flow:
- Modbus Communication: Devices (sensors, controllers) talk to each other using the Modbus protocol, exchanging data like temperature readings, machine statuses, or control commands.
- Modbus Gateway: This acts as a translator, capturing the Modbus data stream.
- Database Integration: The gateway translates the Modbus data into a format compatible with the database (e.g., MySQL). It then writes this data to designated tables within the database.
This process essentially funnels the real-time communication from your industrial setup into a structured database, allowing for long-term storage, analysis, and integration with other systems for improved decision-making and process optimization.
Saving Modbus data to MySQL database using Modbus Gateway (brief version)
- Download MySQL
- Install and configure MySQL
- Create database
- Create outgoing messages table
- Create incoming messages table
- Create user
- Grant privileges to user
- Install and configure Modbus TCP
- Install and configure DHT sensor
- Test DHT sensor
- Install and configure MySQL user
- Test MySQL connection
Installing MySQL database (Video Tutorial)
This quick video tutorial demonstrates how to easily download the right MySQL installer and properly install and set up your MySQL environment for smooth operation. It captures all the necessary steps while barely lasting longer than 3 minutes, making it a great watch.
Installing MySQL database (written guide)
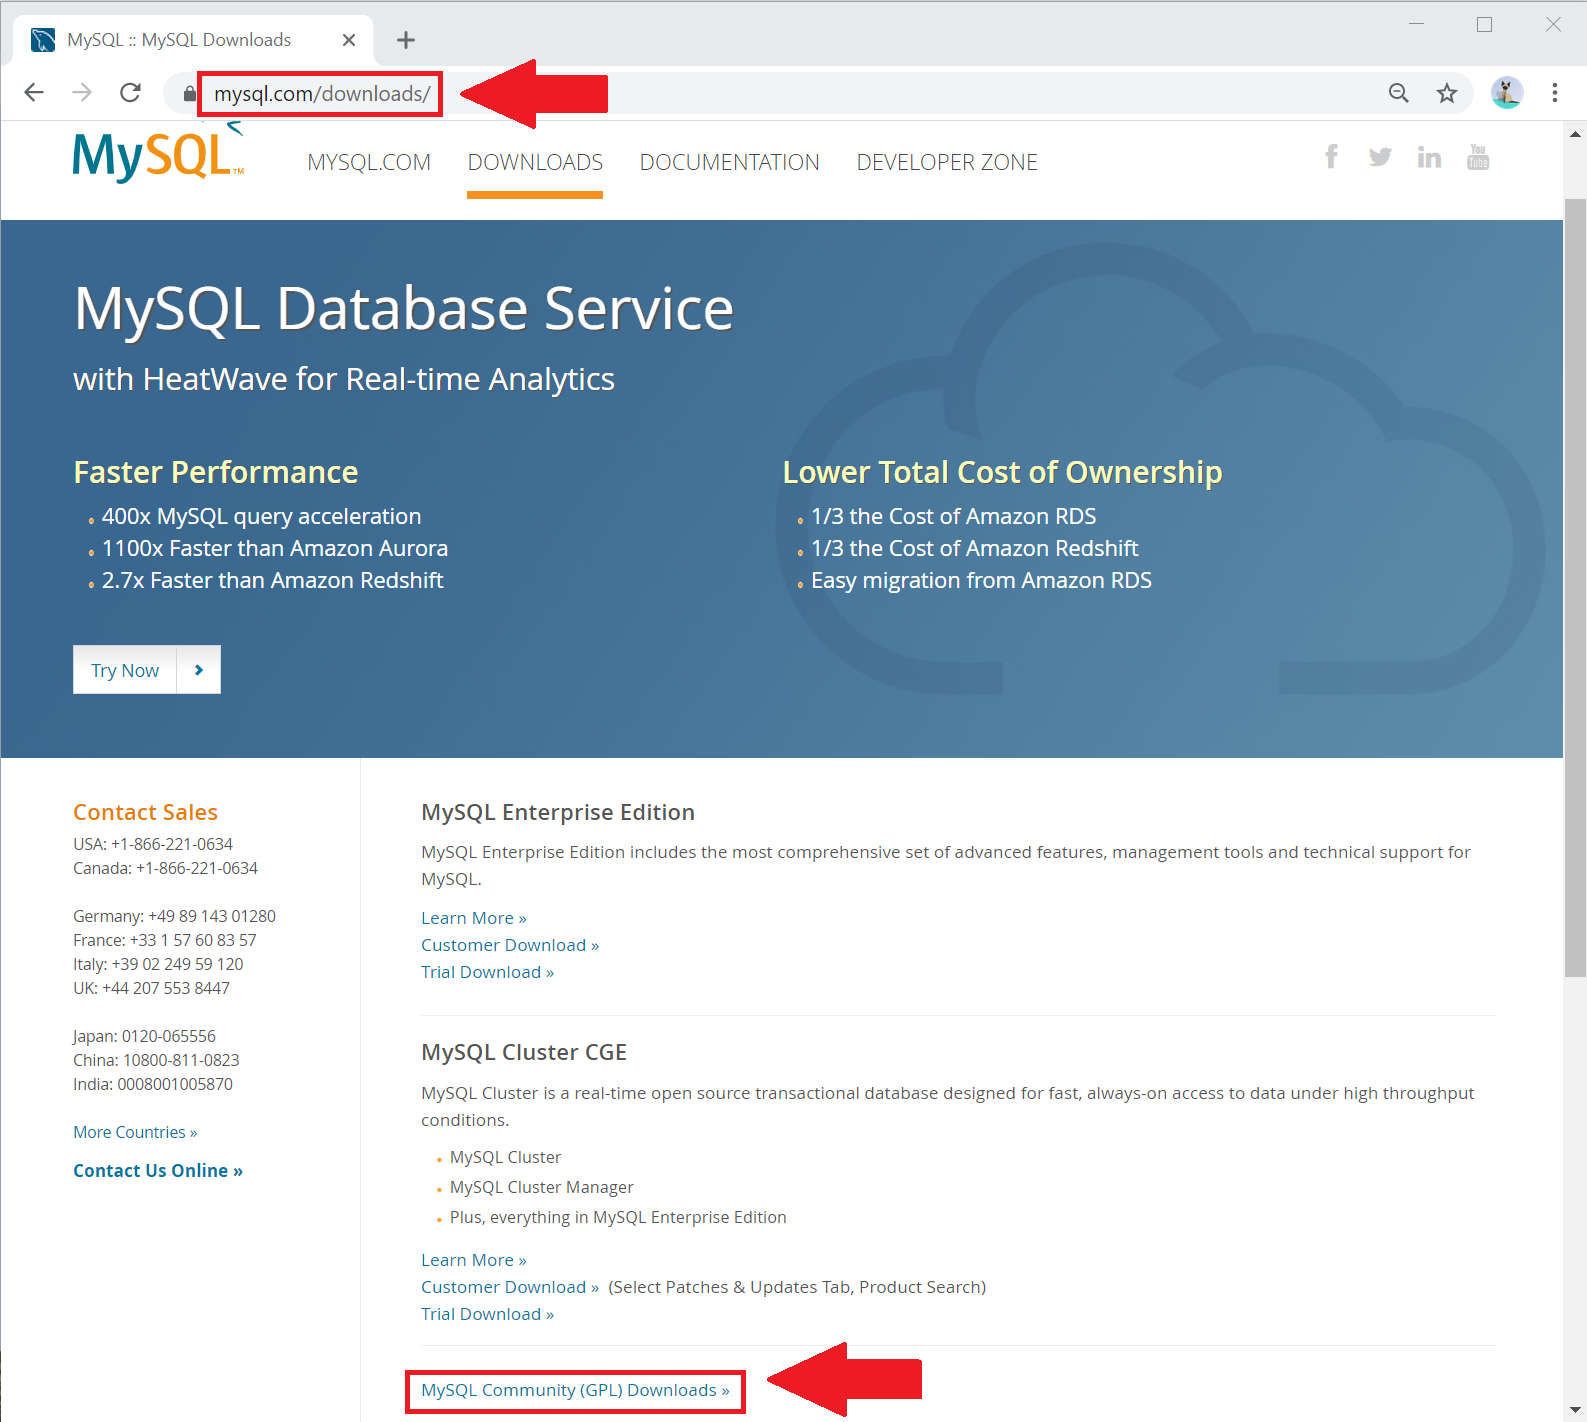
First, head over to the download page of MySQL, and search for the MySQL Community version. Click the link near the bottom of the page, highlighted in Figure 1.
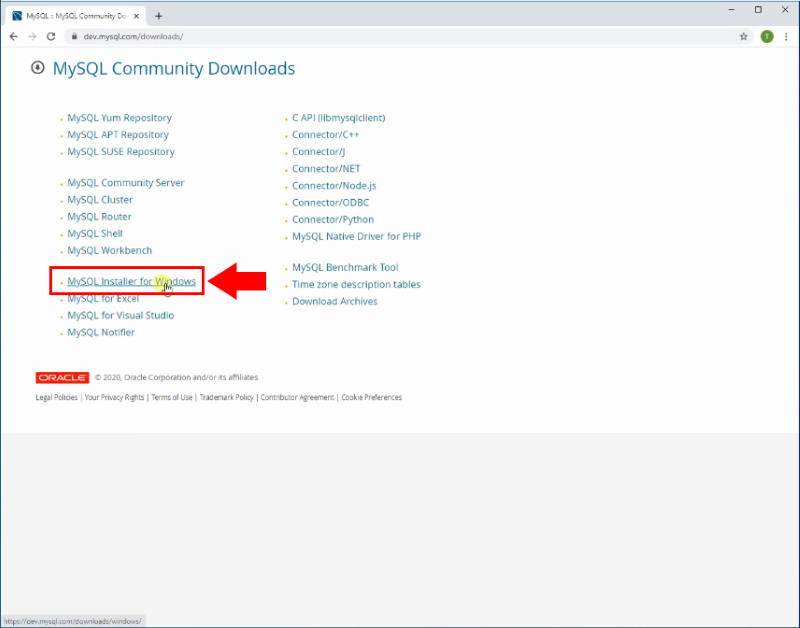
Look for MySQL Installer for Windows, and click on it, as seen in Figure 2.
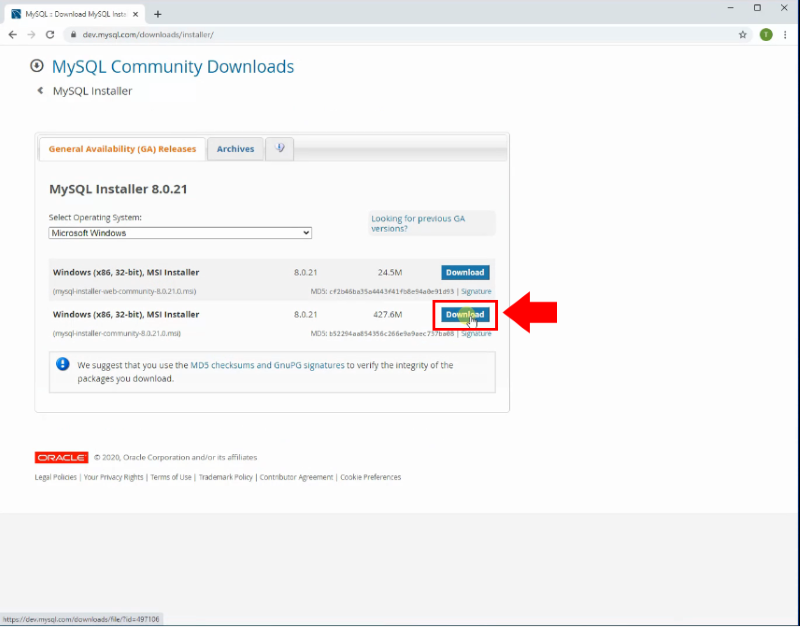
On this page, click Download on whichever version you prefer, as seen in Figure 3. For the sake of this tutorial, we will choose the larger file, as it is the offline, portable version of the installer.
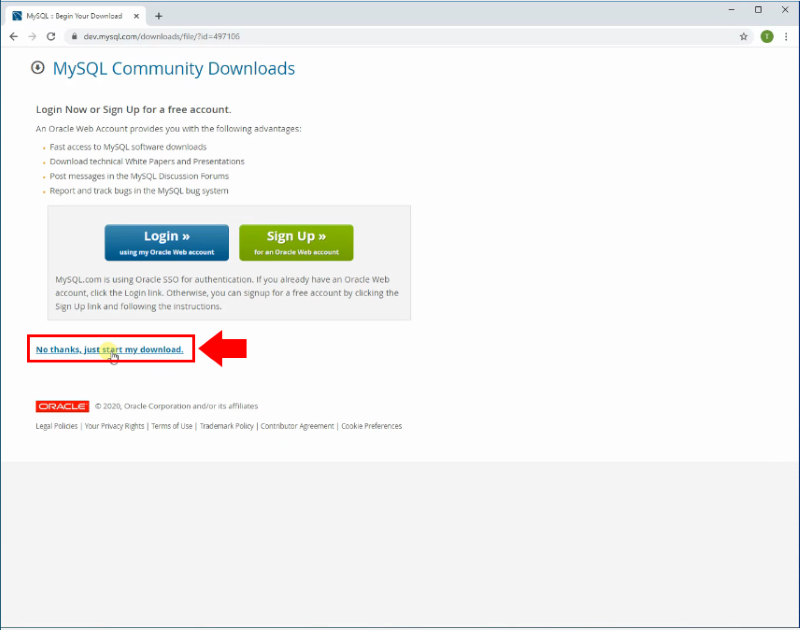
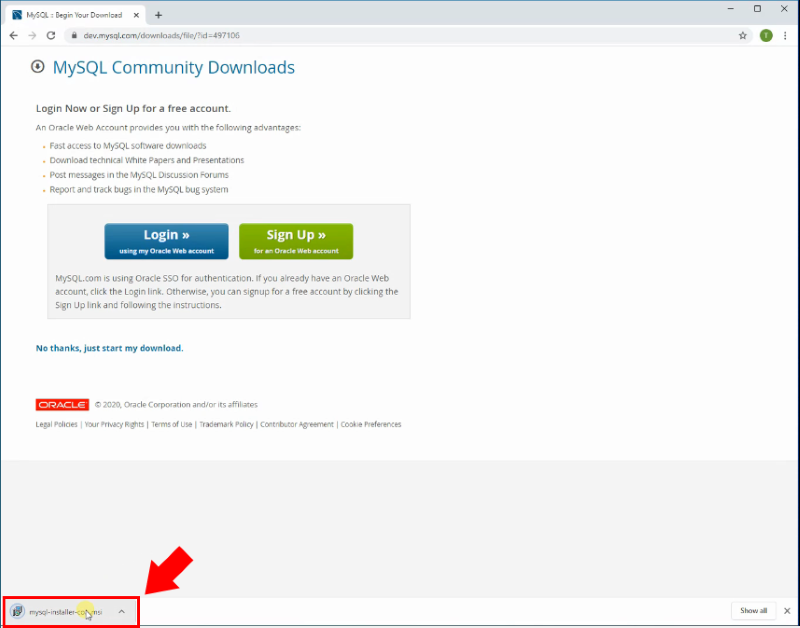
To take full advantage of MySQL, we advise you to create a new account on this step. It is a simple process which should not take more then 10 minutes. If you wish to skip the account creating procedure, you could click the No thanks, just start my download button, and your browser should start downloading the files you need (Figure 4).
Wait for the download to finish, then run the installer, as demonstrated by Figure 5.
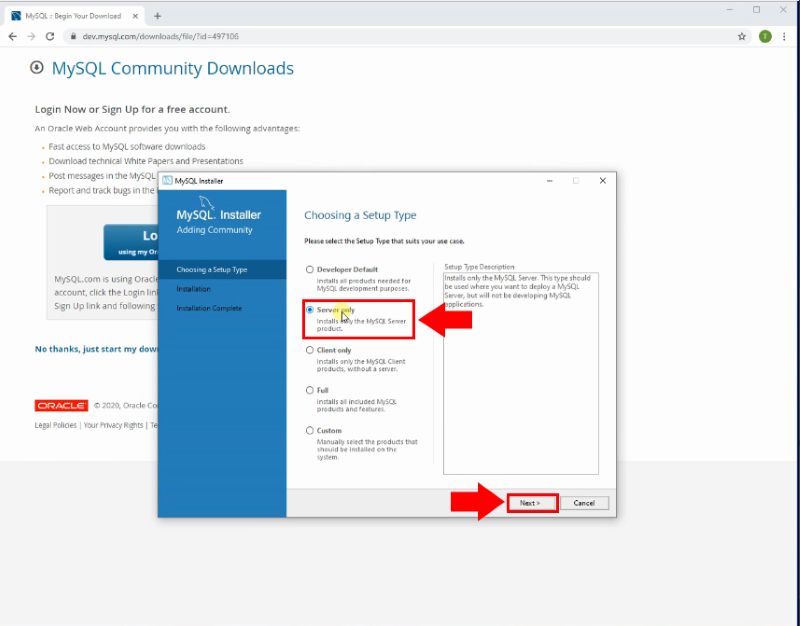
Inside the installer, select Server only, then click Next, similarly to Figure 6.
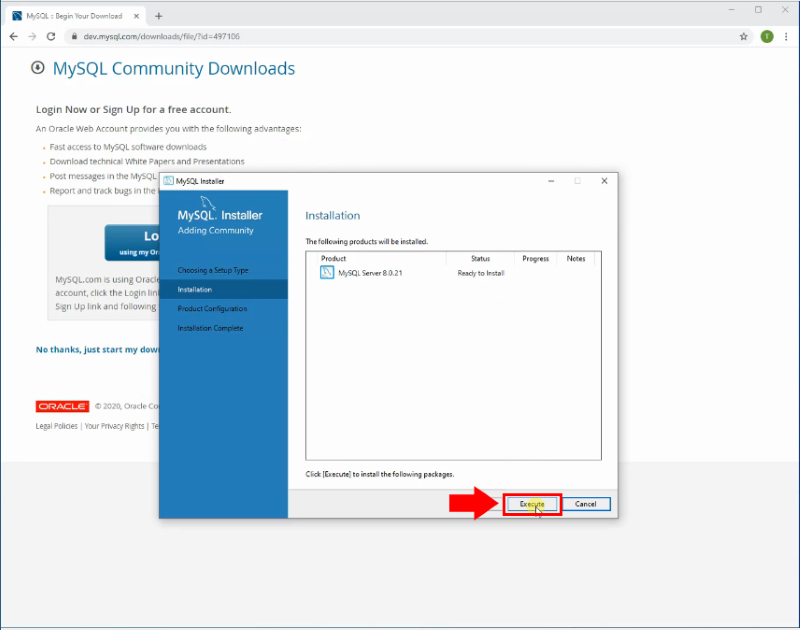
Finalize the products you are installing, then click Execute, as you can see in Figure 7.
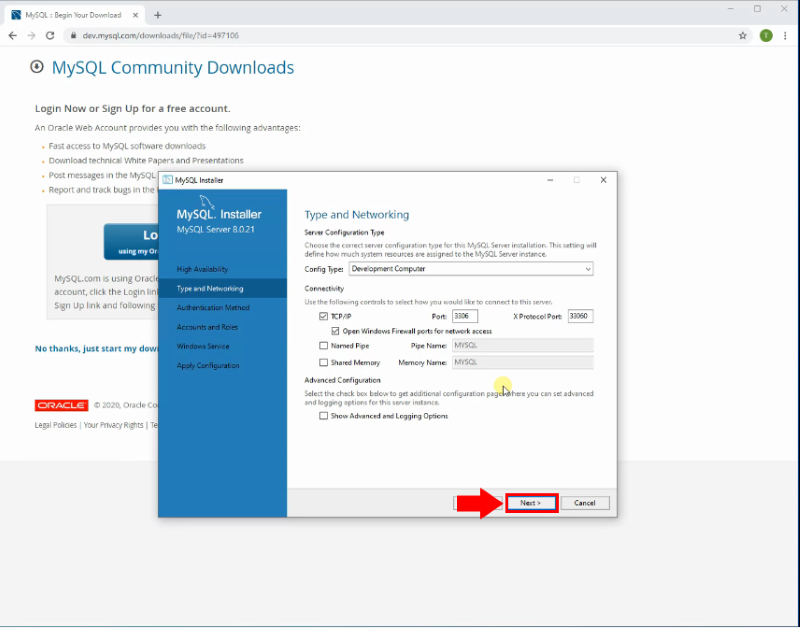
Configure your database server to your preferences. Make sure to tick in the Open Windows Firewall ports for network access box, so your firewall will not disturb the dataflow on the port of your server. If you have everything matched with your preferences, please click Next. You can see our preferences on Figure 8.
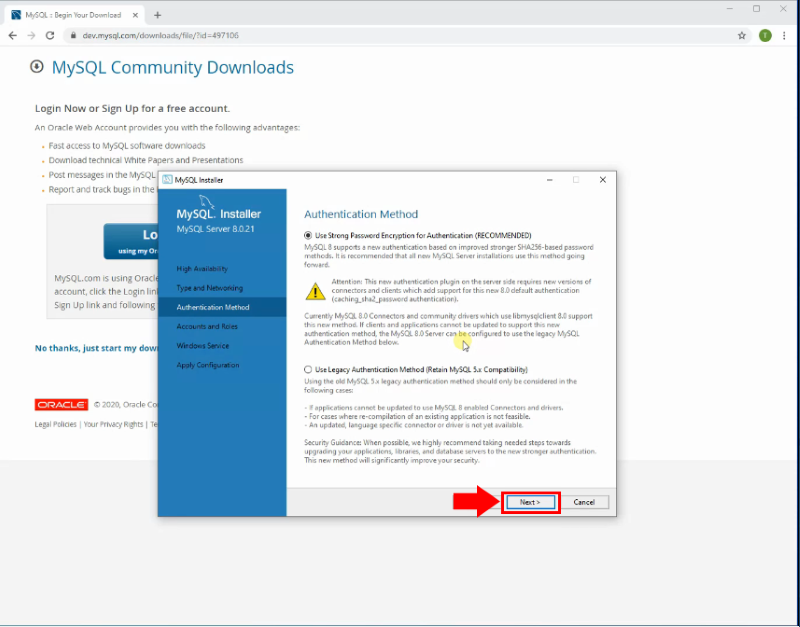
Make sure to choose the newer and more secure Strong Password Encryption for Authentication method. You can see your options on Figure 9. Click the Next button to proceed.
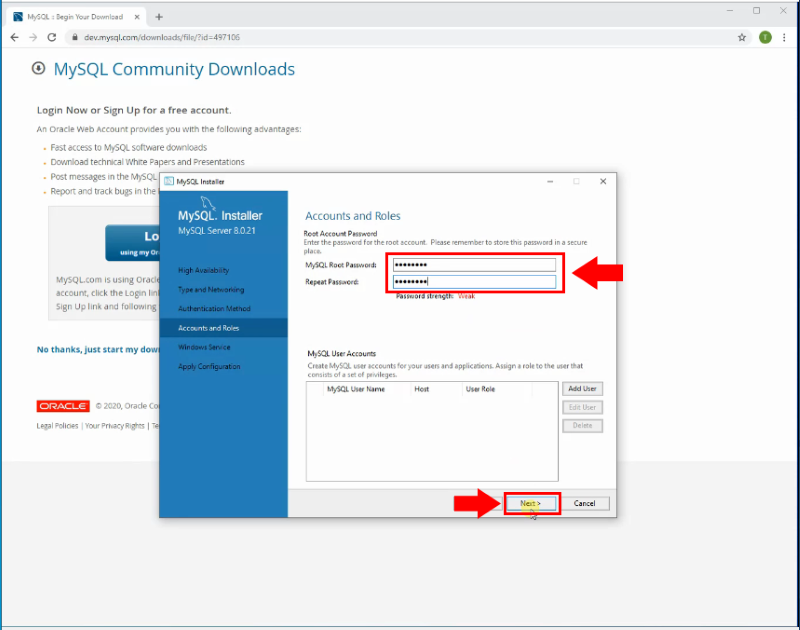
If you chose the more secure method in the last step, you will be presented with the root account password creating window. Enter your desired password, then hit Next (Figure 10).
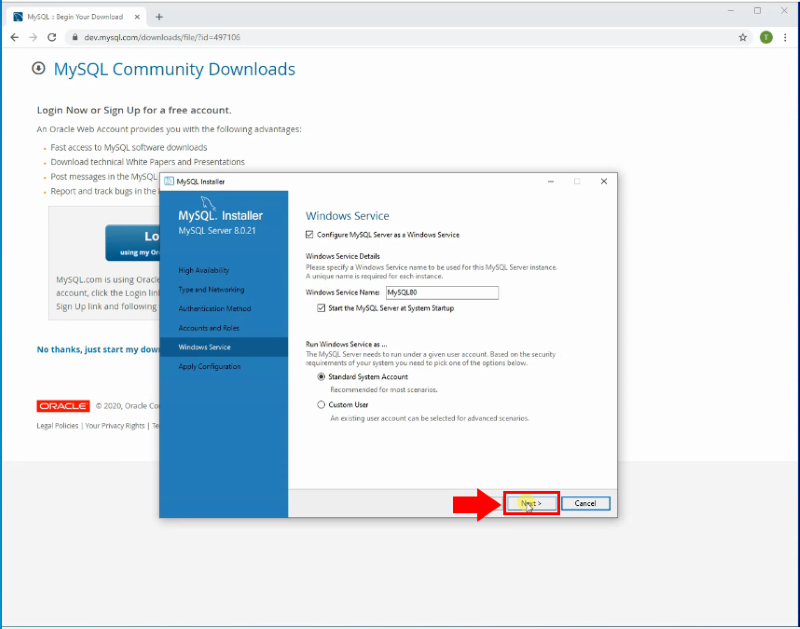
Name your server. This will be how it appears among Windows processes. Make sure that the checkbox next to Start the MySQL Server at System Startup is ticked, so your server will start with Windows, as shown in Figure 11.
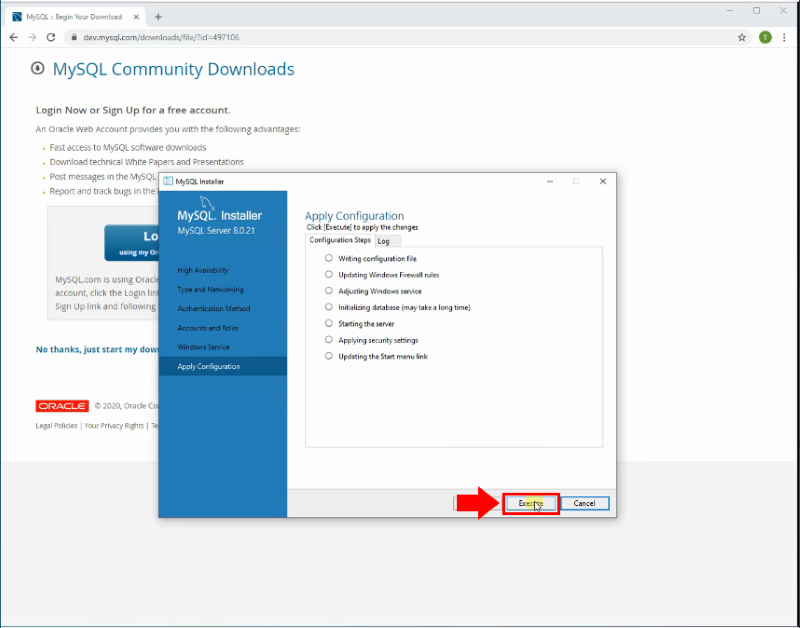
Finalize your installation, and hit Execute, as seen in Figure 12.
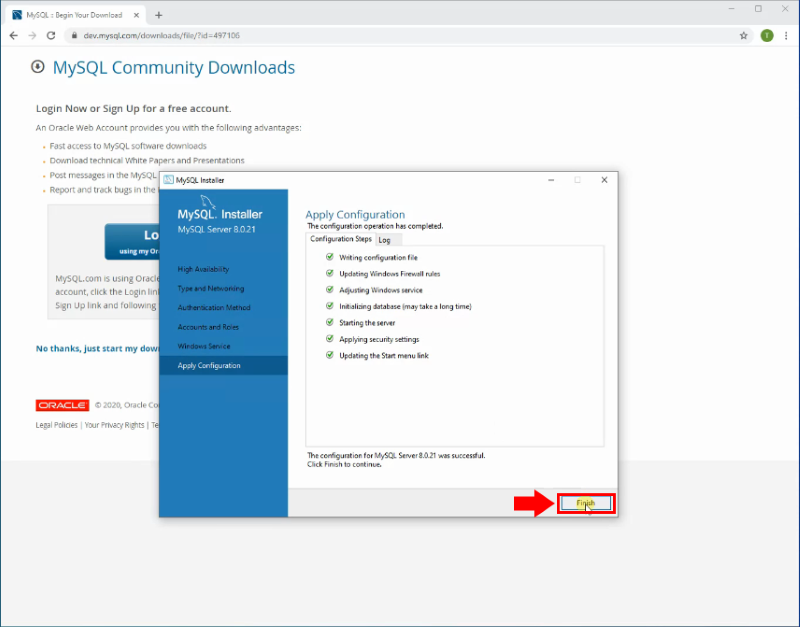
If you have done everything correctly so far, you should see a similar page to Figure 13. Click Finish to exit the installer.
Creating Database tables (Video Tutorial)
Got 2 minutes? This quick video tutorial demonstrates how to easily create a database and tables into your newly created database, all in under 113 seconds, making it a very efficient use of your time.
Creating Database tables (in-depth version)
MySQL CREATE TABLE statements to copy:
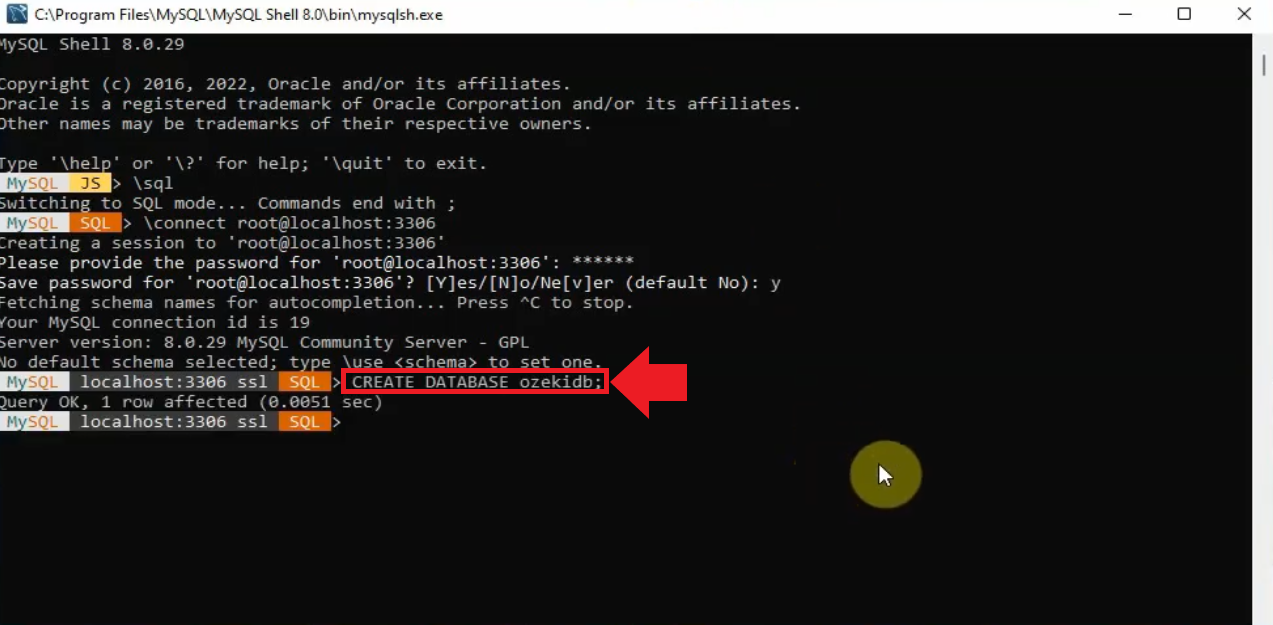
CREATE DATABASE ozekidb;
MySQL CREATE TABLE statements to copy:
CREATE TABLE ozekimessagein (
  id int(11) NOT NULL auto_increment,
  sender varchar(255) default NULL,
  receiver varchar(255) default NULL,
  msg text default NULL,
  senttime varchar(100) default NULL,
  receivedtime varchar(100) default NULL,
  operator varchar(100) default NULL,
  msgtype varchar(160) default NULL,
  reference varchar(100) default NULL,
  PRIMARY KEY (id)
  ) charset=utf8;
  ALTER TABLE ozekimessagein ADD INDEX(id);


CREATE TABLE ozekimessageout (
  id int(11) NOT NULL auto_increment,
  sender varchar(255) default NULL,
  receiver varchar(255) default NULL,
  msg text default NULL,
  senttime varchar(100) default NULL,
  receivedtime varchar(100) default NULL,
  reference varchar(100) default NULL,
  status varchar(20) default NULL,
  msgtype varchar(160) default NULL,
  operator varchar(100) default NULL,
  errormsg varchar(250) default NULL,
  PRIMARY KEY (id)) charset=utf8;
  ALTER TABLE ozekimessageout ADD INDEX (id);
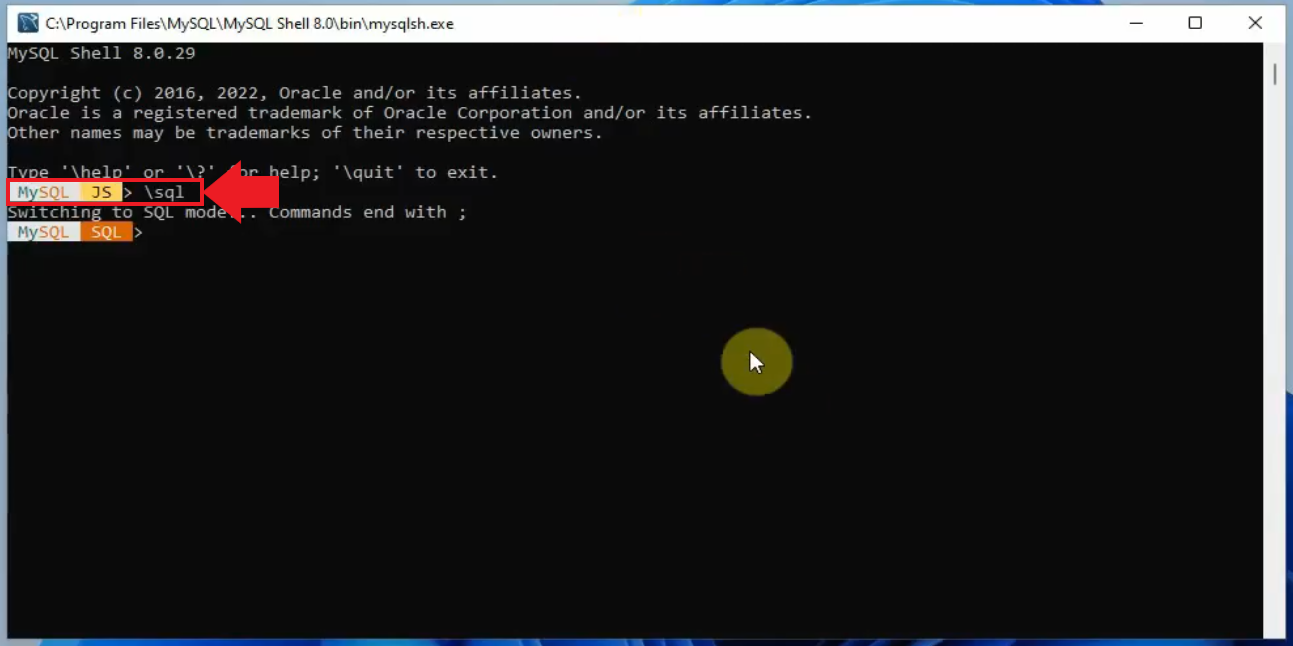
Open the MySQL Shell and type \sql into it to change the shell mode to SQL, as illustrated in Figure 14.
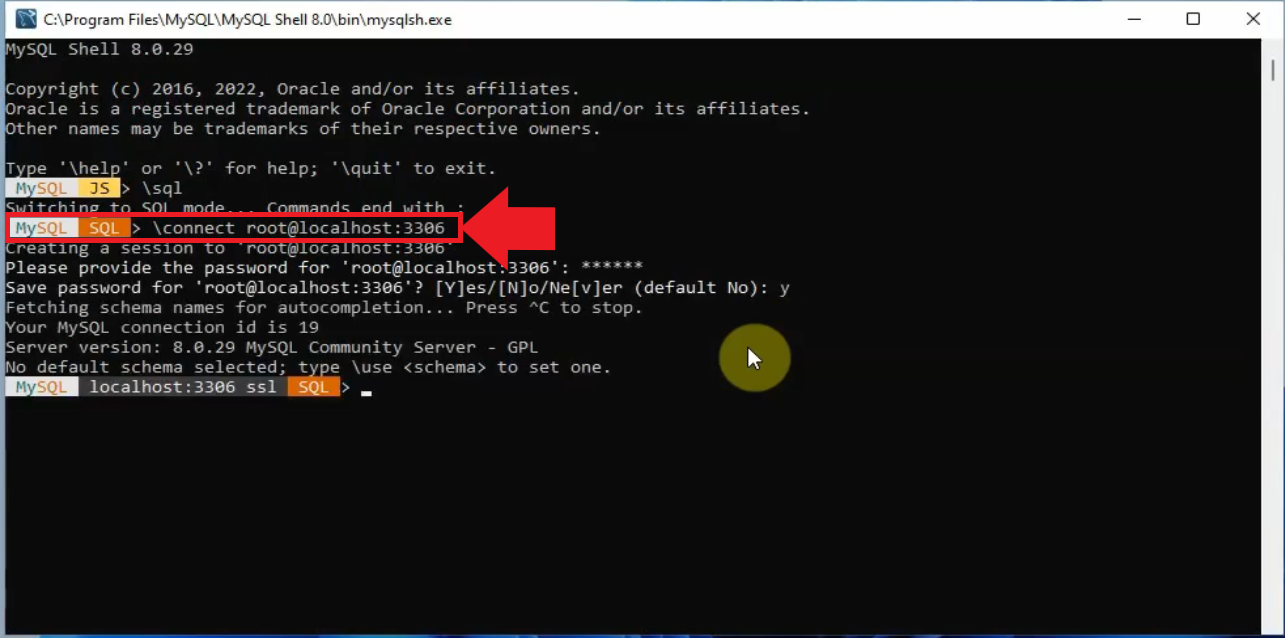
Connect to your server. Type \connect root@localhost:3306 into the shell. Where root is the user and localhost:3306 is the server address, as you can see in Figure 15.
Create a database statement by using the command above (Figure 16).
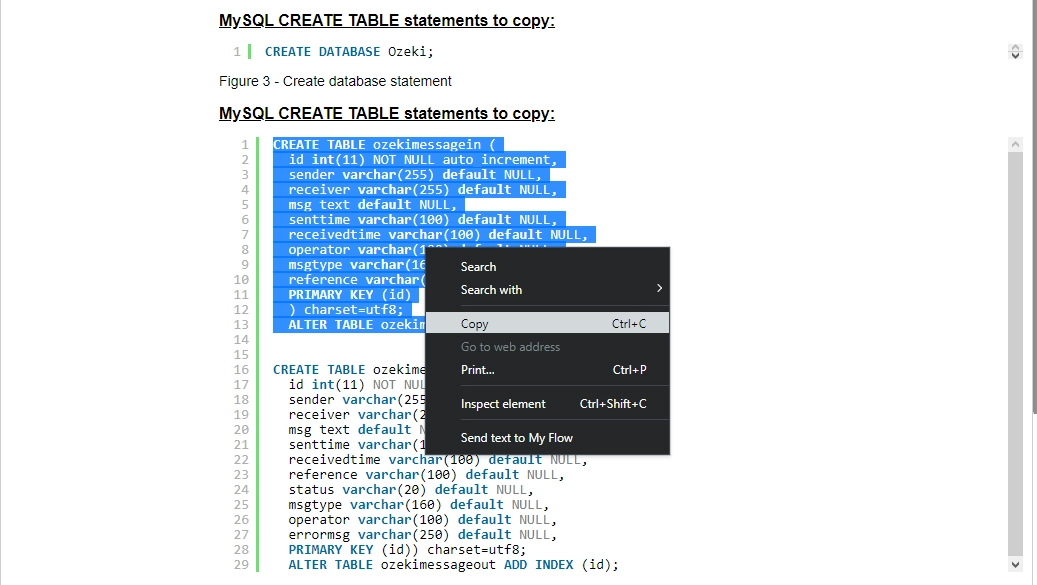
Next, copy the highlighted (Figure 17) part of the code from this article.
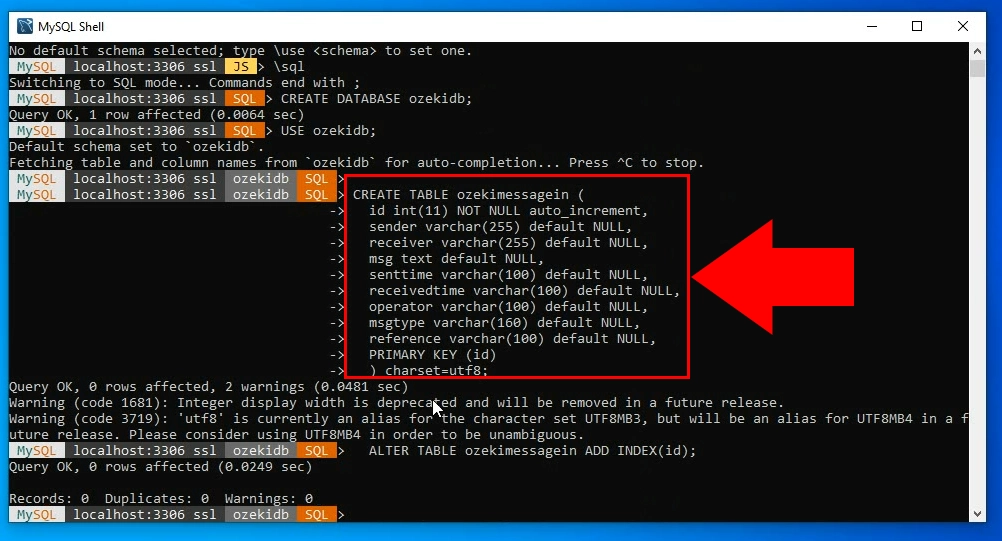
Paste and run it in MySQL Shell to create the table for incoming messages, as seen in Figure 18.
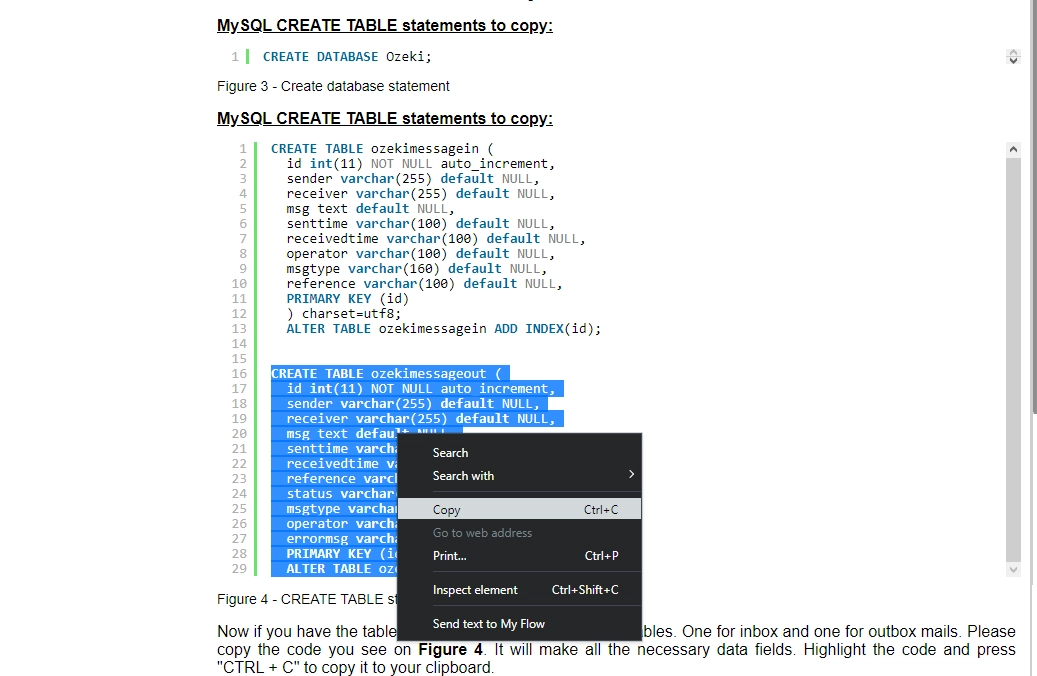
Once again, select and copy the highlighted part of the code above, similarly to Figure 19.
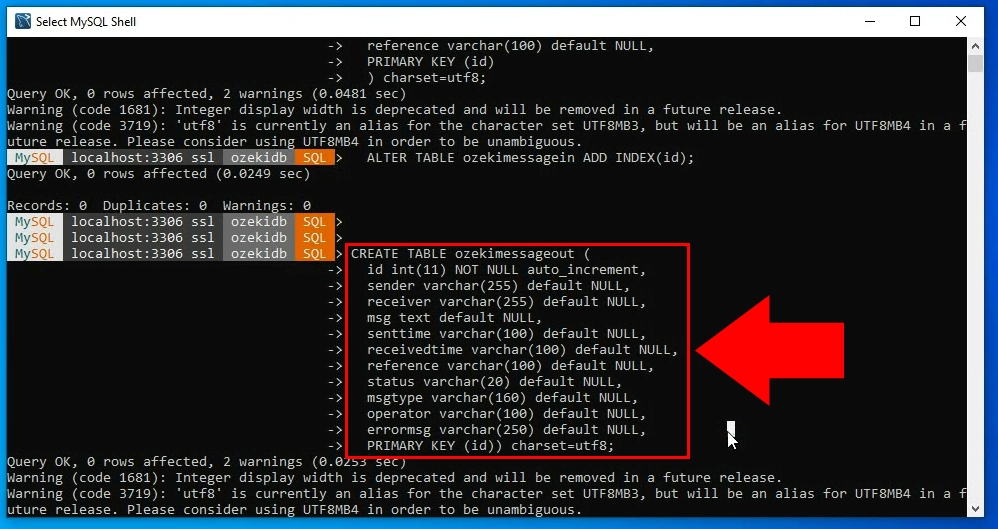
Paste and execute it in MySQL Shell to create outgoing message table (Figure 20).
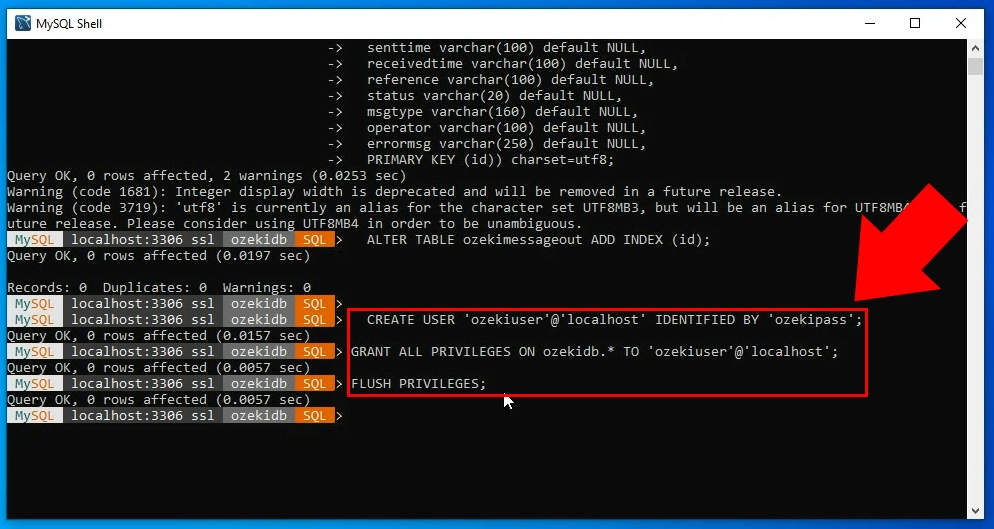
To create a user and grant it privilages, use the following code, as seen in Figure 21.
CREATE USER 'ozekiuser'@'localhost' IDENTIFIED BY 'ozekipass';
GRANT ALL PRIVILEGES ON ozeki.* TO 'ozekiuser'@'localhost';
FLUSH PRIVILEGES;
Save Modbus data to MySQL database (video tutorial)
The third and last video in this article goes over setting up the connection between your sensors and your MySQL database using Modbus Gateway in Ozeki. You will be taught to install and configure a Modbus TCP gateway, a MySQL connection, and even test your sensors. Sounds complicated, but this tutorial will help you hit the ground running in 3 minutes.
Save Modbus data to MySQL database (in-depth version)
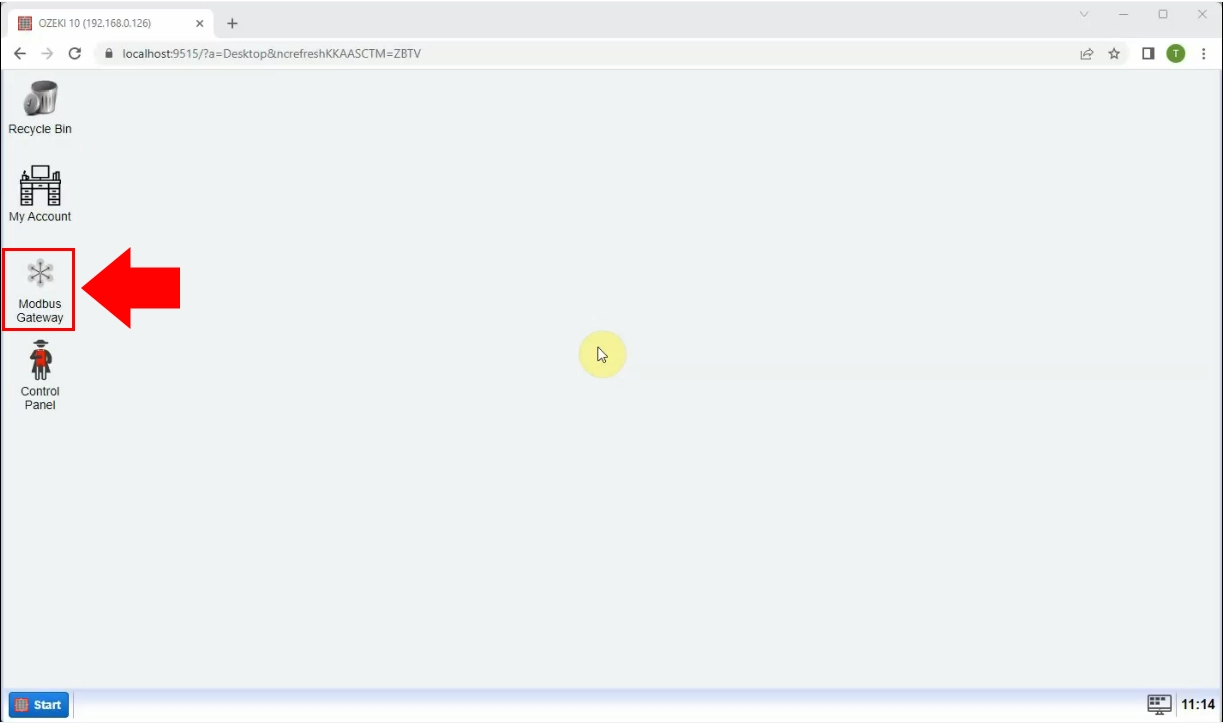
Inside Ozeki 10, open Modbus Gateway, as seen in Figure 22.
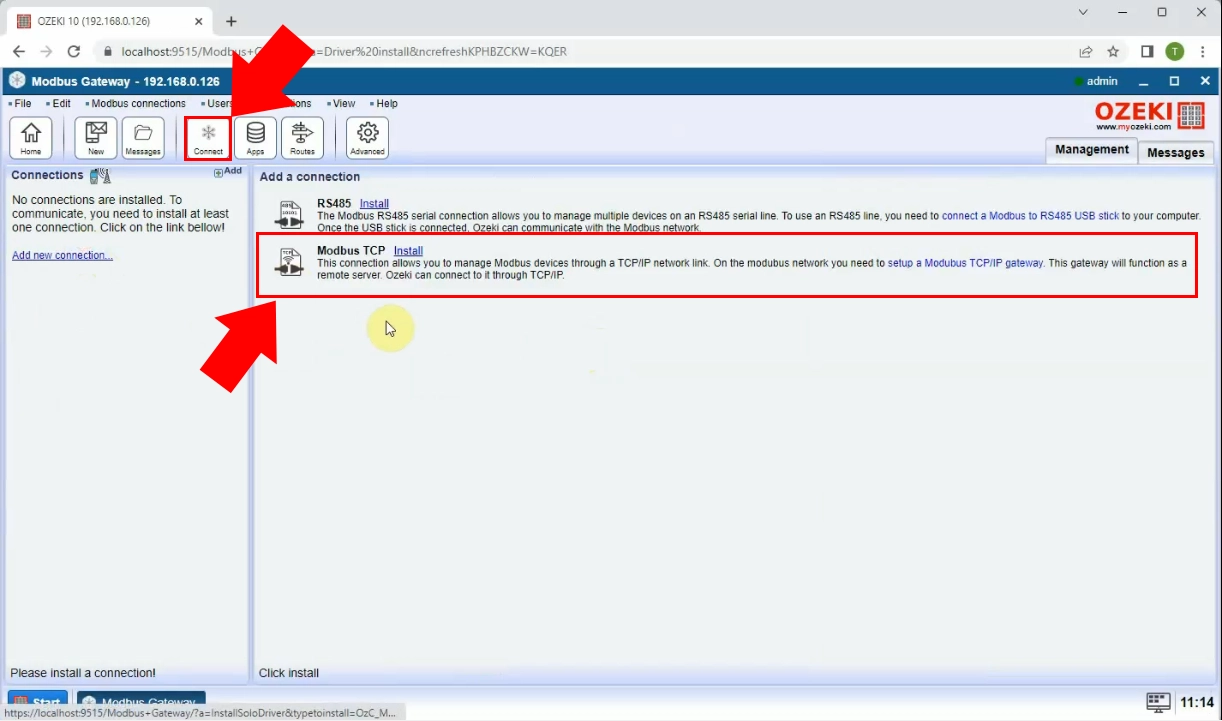
Click the Connect button on the toolbar, and click on Install next to Modbus TCP, as shown in Figure 23.
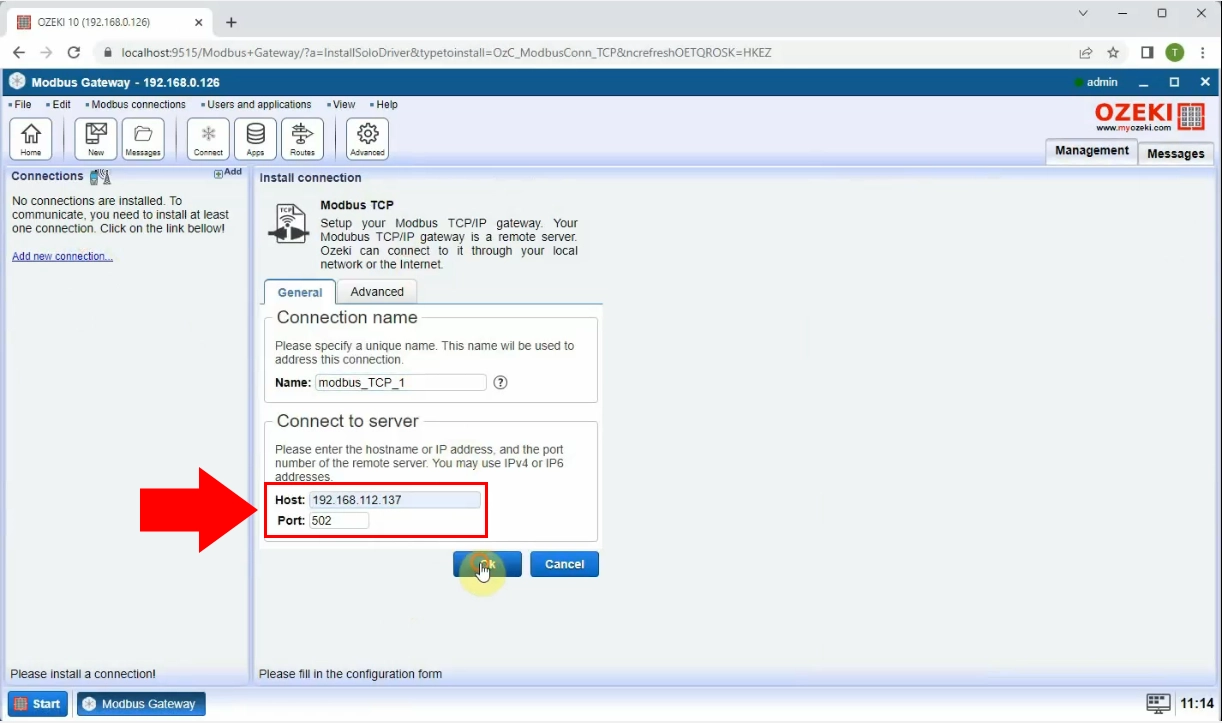
Enter your host address and port to the corresponding fields, then hit Ok (Figure 24).
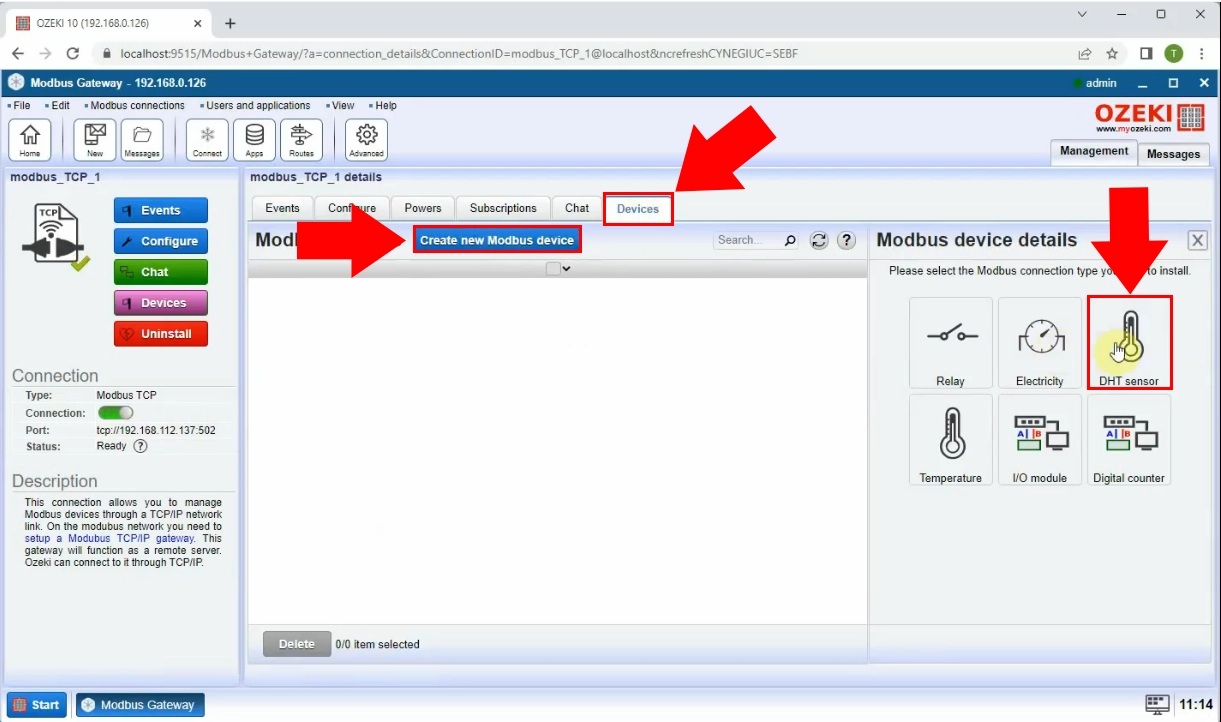
In this page, select Devices, click Create new Modbus device, then choose your desired sensor. For the sake of this tutorial, we will go with DHT sensor, as seen in Figure 25.
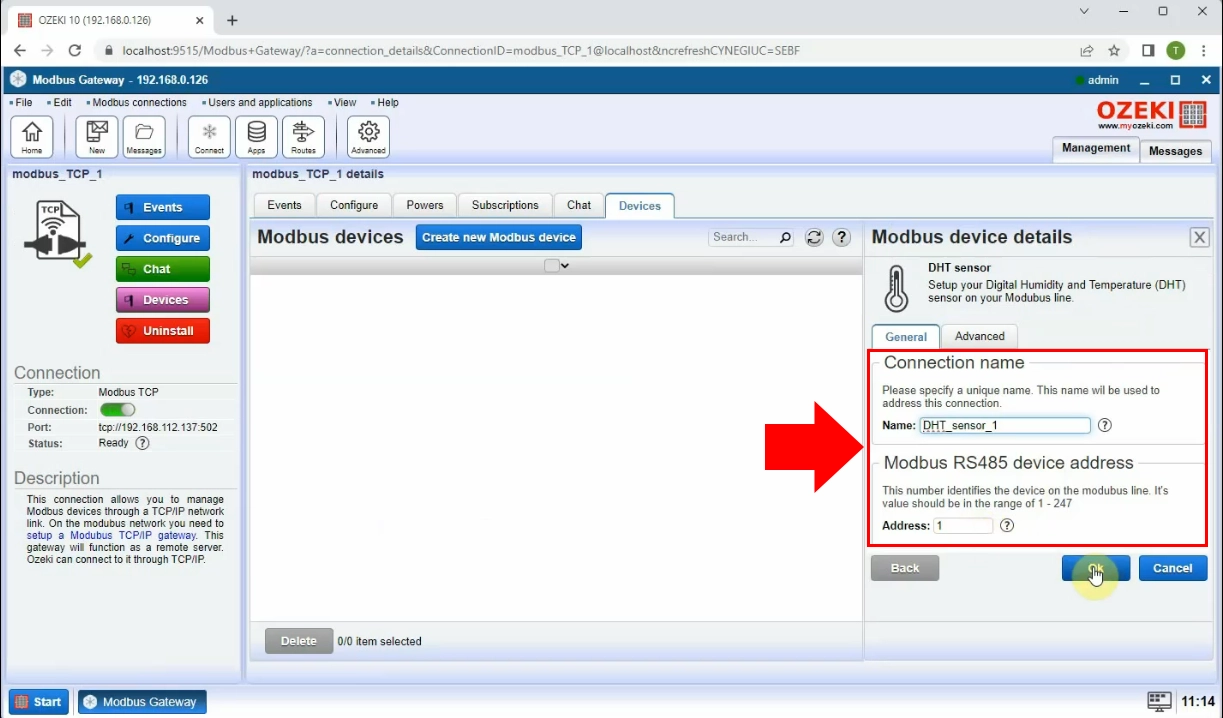
Configure your DHT sensor details in the right panel, and hit Ok, the same way as in Figure 26.
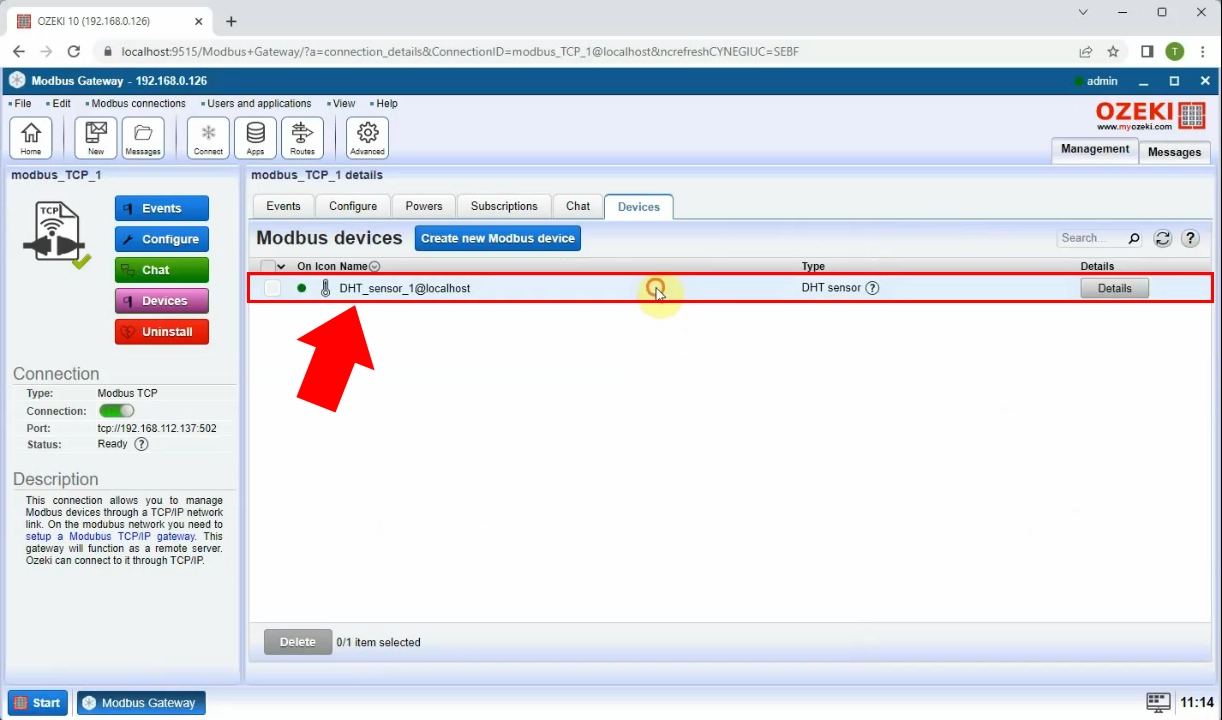
Your device should appear in the list. Click on the Details button of it near the right hand side of the screen, similarly to Figure 27.
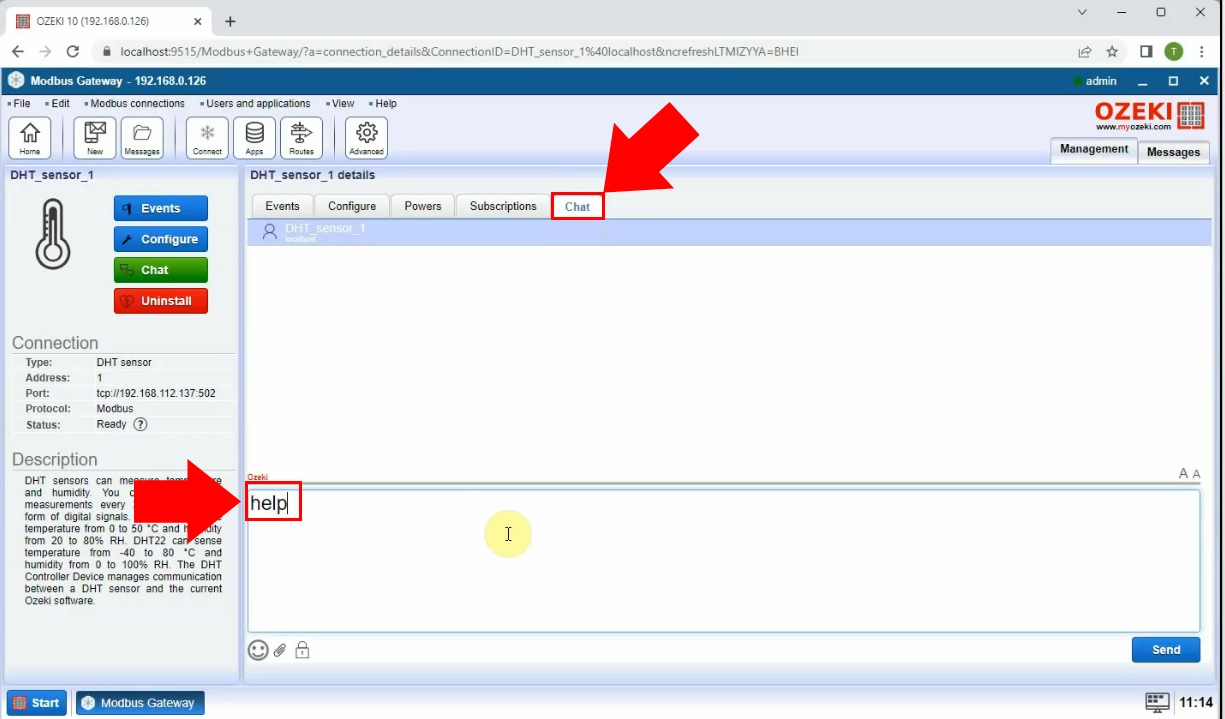
Select Chat near the top, type "help" in the message field, and hit Send (Figure 28).
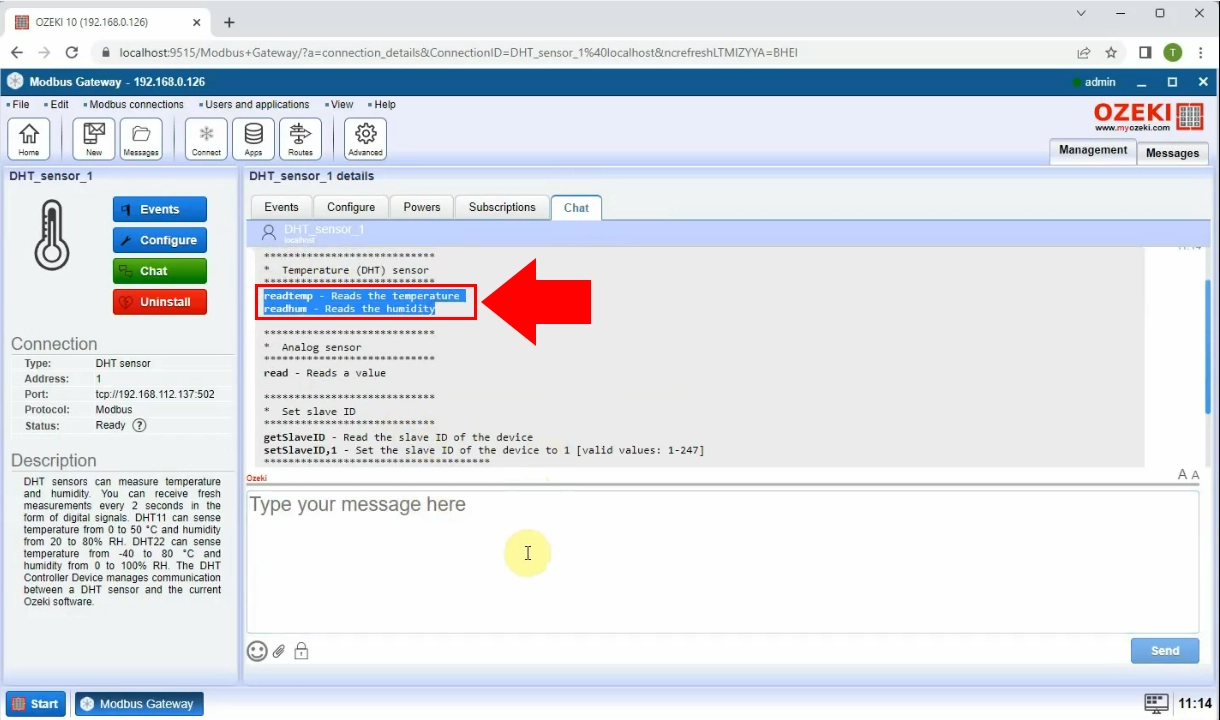
This will list all the commands available to you. Look for readtemp and readhum, as demonstrated by Figure 29.
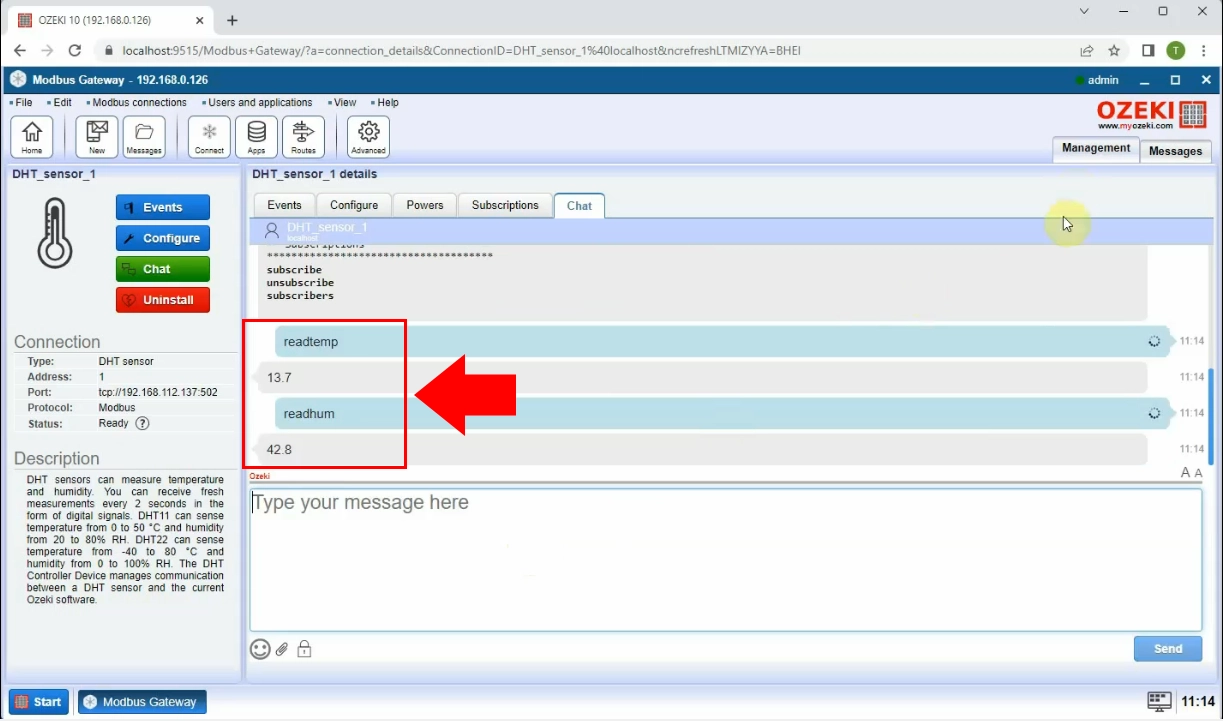
Try your DHT sensor's functionality by typing and sending readtemp and readhum. These will return the temperature and humidity the sensor is currently reading, respectively (Figure 30).
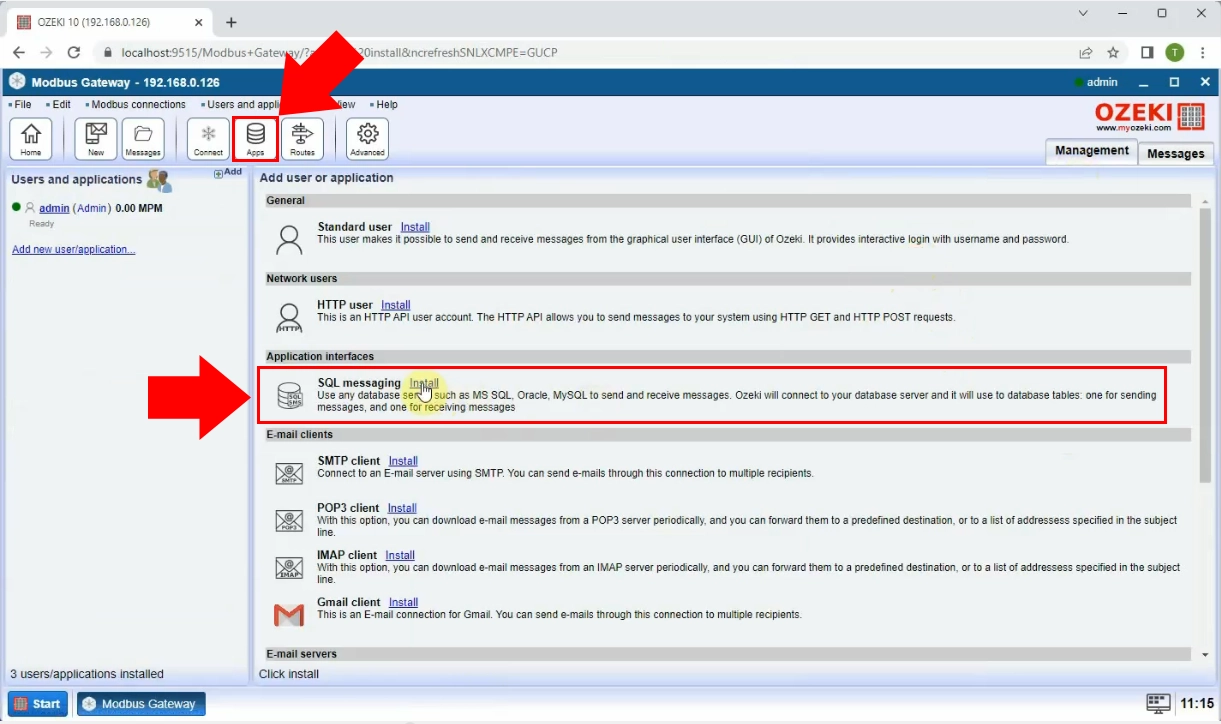
Click on the Apps button near the top of the screen, then scroll down until you see SQL messaging, and hit Install, highlighted in red in Figure 31.
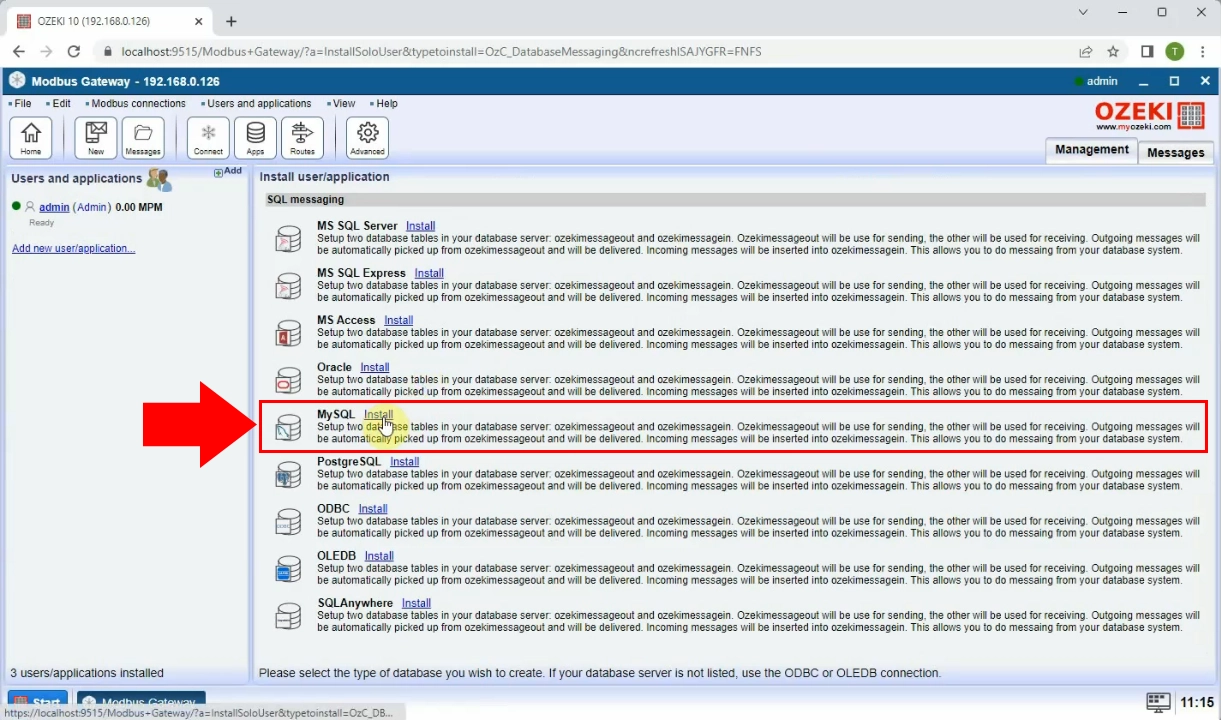
Look for MySQL and click Install (Figure 32).
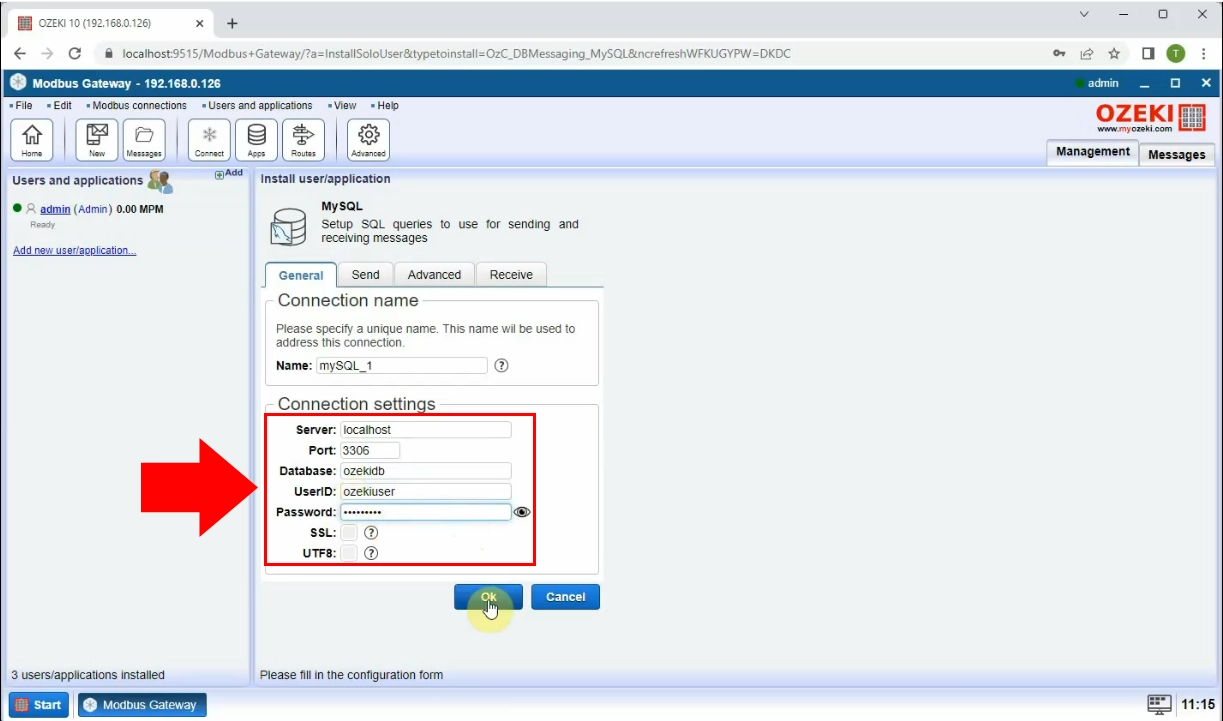
Configure your connection settings, then click Ok, as shown in Figure 33.
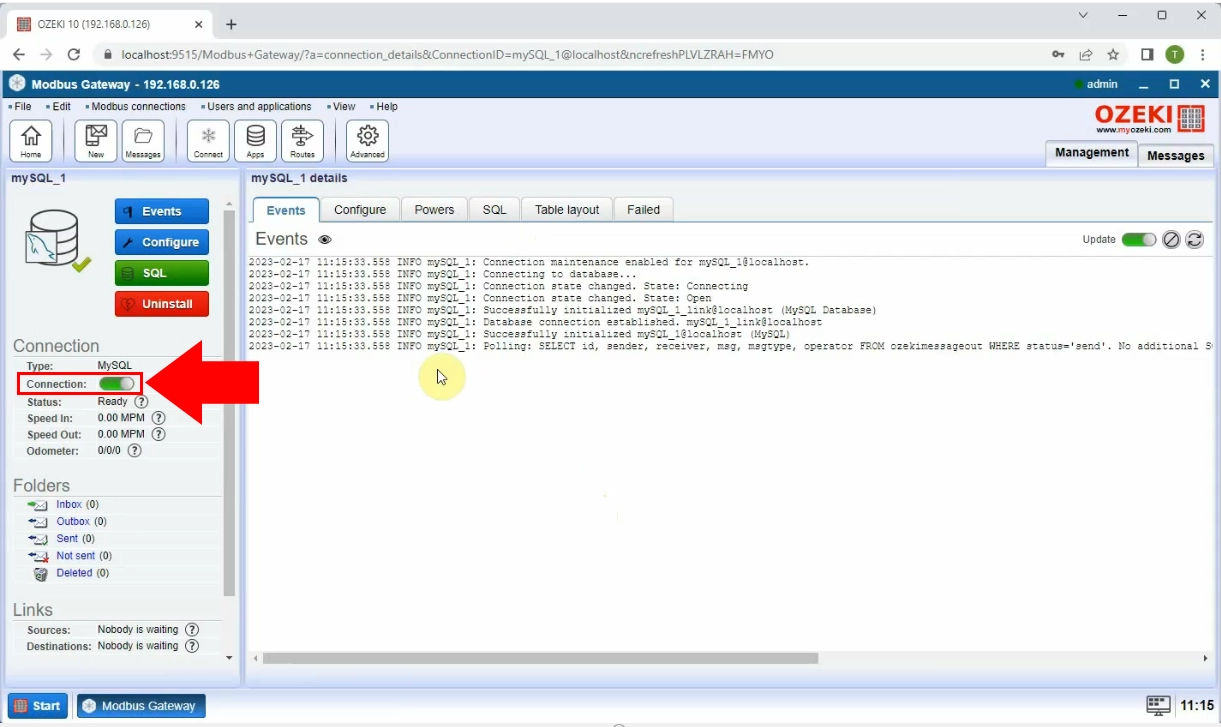
On the page of your new connection, make sure the slider next to Connection in the left panel is turned on, as you can see in Figure 34.
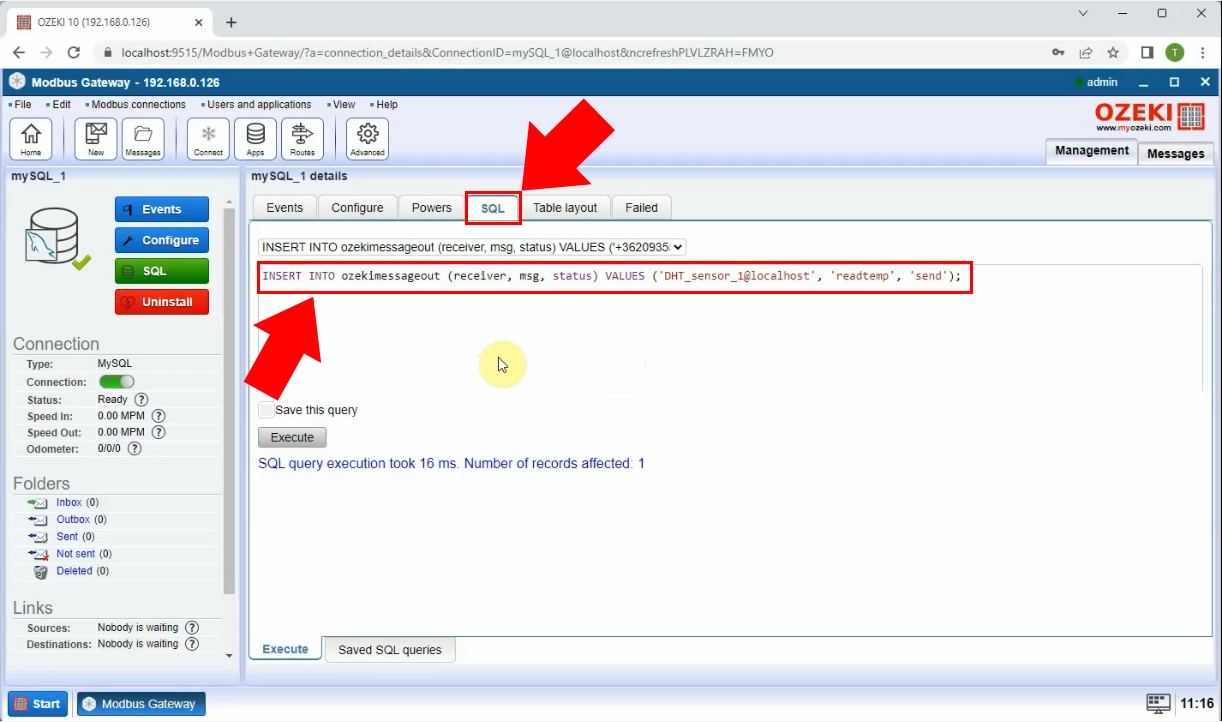
Click on the SQL page, enter and execute the following code (Figure 35):
INSERT INTO ozekimessageout (receiver, msg, status) VALUES ('DHT_sensor_1@localhost', 'readtemp', 'send');
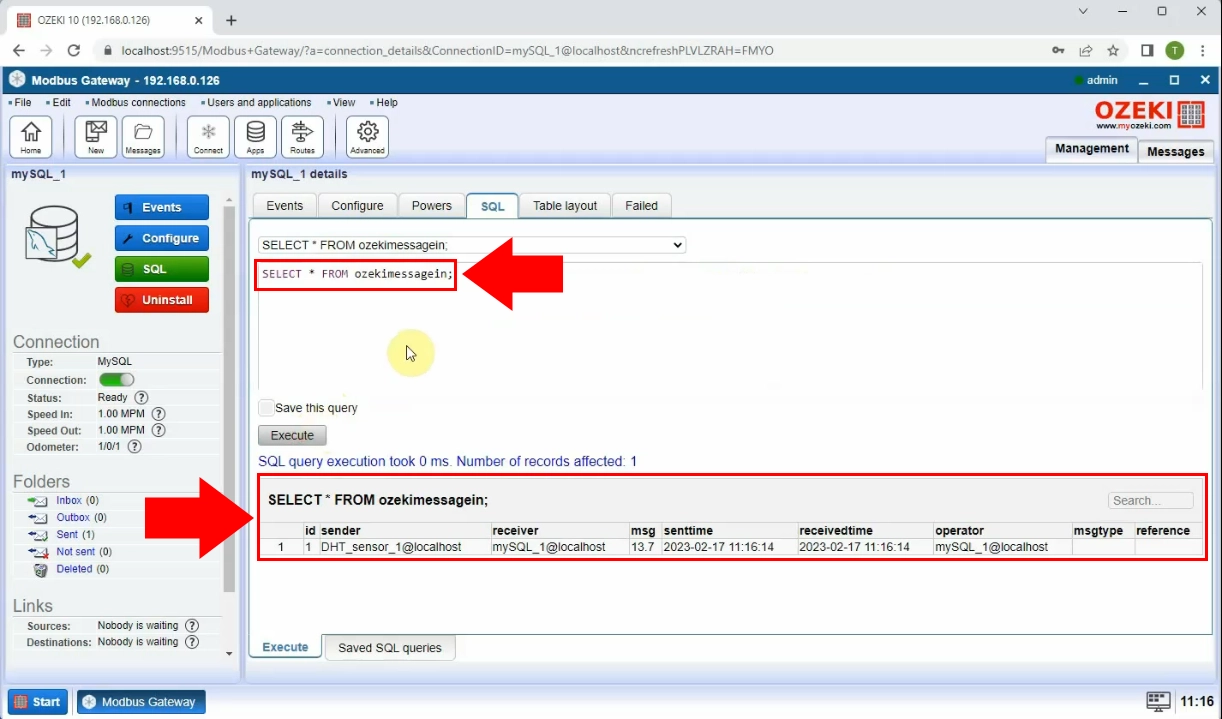
If you have done everything correctly, you should see a return similar to Figure 36.
Can I use other Modbus devices?
Yes, Modbus Gateway allows you to monitor other Modbus devices, such as relays, temperature sensors, I/O modules and digital counters.
Can I use other database management systems?
Yes, for example you may choose to use MS Access, PostgreSQL, SQLAnywhere and more.
